How to Burn Downloaded Videos to Blu-ray/ DVD on Mac & PC

David James
Updated on Aug 29, 2023
Nowadays, people take more time on Internet through portable digital devices (iPhone, iPad, Android, Kindle Fire...) than PCs for video streaming. When you come across some funny videos online, you may download them off and keep onto your computer hard drive. If you're looking for a way to play them on home theater center connected with big TV, then burning those downloaded videos to Blu-ray or DVD can be a great way.
iDVD was a free DVD authoring tool that enables you to convert downloaded videos to DVD for Mac quickly to play in DVD player, unfortunately, Apple decided to stop including it on Macs shipping with OS X 10.7 Lion and later OS X versions. While for Windows users, Windows DVD Maker was no longer preinstalled on Windows starting with Windows 8. You can't find either of them in your new-updated computer, not to mention the burning task of downloaded movies to Blu-ray on Mac's or PCs.
The good news, there are dozens of strong alternatives out there for burning DVD/ Blu-ray with downloaded (HD) videos from the internet (YouTube, Vuze, Facebook, Vimeo, MetaCafe, Dailymotion, NetFlix, Hulu, Break...). Today we'll talk about a program - Blu-ray Creator for Mac, an easy-to-use disc burning utility aimed squarely at the both beginner and power user. It lets you create DVD and Blu-ray from downloaded (HD) videos on Mac OS X, and also convert recorded footage, and other type of digital audios & videos to fit on a Blu-ray/ DVD disc with interactive menus in various templates. The application also includes built-in video editing tools to enhance your downloaded movie files before burning.
As a cross-platform Blu-ray / DVD burning tool, you can get its PC counterpart - Blu-ray Creator for Windows to convert download videos and burn to a Blu-ray/ DVD disc to play on a standalone Blu-ray player.
Click the corresponding download link above to get the right copy of this Blu-ray Creator on your computer. Afterward, follow the on-screen instructions to install. Launch it when the installation process is complete.
How to burn Downloaded movies to Blu-ray on Mac & PC
STEP 1
Add downloaded (HD) movies from your local folder
When making a Blu-ray, you first need to add your source files.
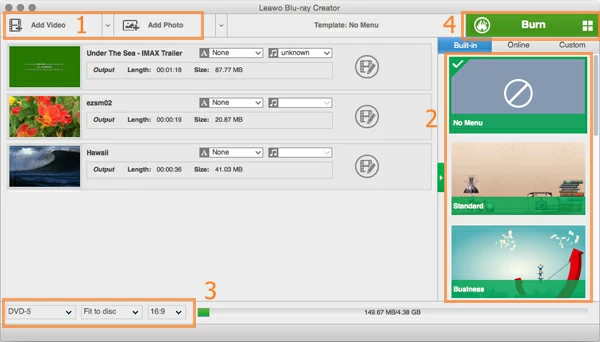
Press and hold the Ctrl key, and then click each video you downloaded from YouTube, Facebook, Vimeo, etc., and drag them to the program window. Alternatively, you can use the usual way, by hitting the "Add Video" option on the top of main interface to add download movies you want to burn onto a blank Blu-ray on Mac & PC.
You then will see all of videos appearing on the list as shown below.
On the right side of each video, you can click "Edit" icon to do some basic editing, it's really a good way to get rid of something to meet your need. Things like removing the black bars, trimming the video to get the part you want, adjusting effects and putting watermark on the video are all available. - Optional!

STEP 2
Customize the Blu-ray menu style
Once the downloaded video chosen, on the right pane of the window there are multiple Blu-ray menus you can choose from for easier navigation.
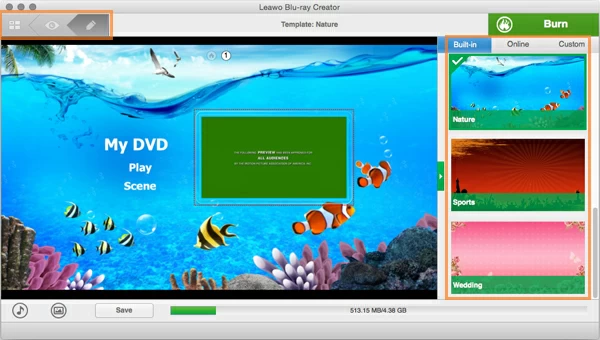
Choose one of menus and click the "Preview" eye-like icon (appearing when cursor over the menu thumbnail) to see what the menu will look like before you burn the downloaded videos to Blu-ray in Mac & Windows. If you want to get more control, click the "Pen" icon on the upper-left side of screen, you then can customize the menu text (double-click) such as font-size, bold, color, underline, and drag any element of menu to a position you want.
Note that on the lower-left side of screen, you can add additional audio track and image as the background to your Blu-ray menu by clicking the options respectively.

Click the icon on the upper leftmost side of screen to back to main interface.
STEP 3
Configure the Blu-ray burning settings
Before the actual burning of downloaded movies to Blu-ray in Mac, you'll have to set up some necessary options.
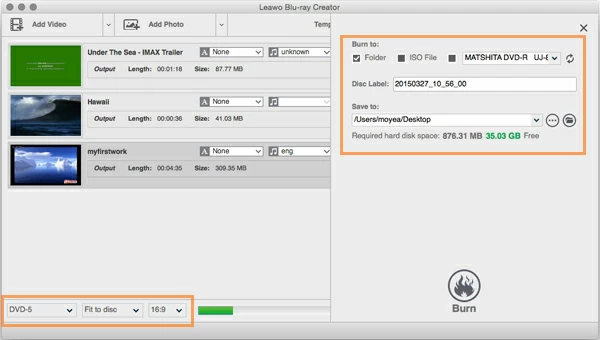
Move mouse to the bottom left, choose the disc type you want: DVD-5 (4.7GB), DVD-9 (8.5GB), BD-25 (25GB), BD-50 (50GB), and then select burning speed, here "Fit to Disc" is recommended, next you'll set aspect ratio: 16:9 for wide screen, while 4:3 is used for standard screen (If you use 16:9 on a regular screen, it will show black bars on the top and bottom edges).

Then, press the green "Burn" button on the top right side, you'll see a panel that pops up, In "Burn to" field, we check the disc option. If you at the same check the Folder and ISO File box, this Blu-ray converter for Mac will create the AUDIO_TS and VIDEO_TS folders, as well as ISO image file on the path of your local hard drive you set.
STEP 4
Burn Downloaded videos to Blu-ray
Once you've made all of the customizations and settings, it's time to convert your downloaded home videos to Blu-ray disc.
Insert a blank Blu-ray disc into Blu-ray drive on your computer as you would normally. Again, press the "Burn" button and your computer will do the rest.
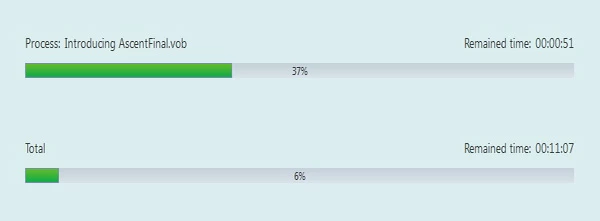
The current screen will close and a new window will open and show you the progress of burning downloaded videos to Blu-ray on your Mac (or Windows) machine.
Related: how to burn GoPro videos to Blu-ray on Mac and PC.
The process of burning a Blu-ray will take times. A full movie Blu-ray can take anywhere up to an hour or even more depending on the (HD) movie contents you've selected and how powerful your computer hardware is.

That's it!
Once your burn is completed, you'll be able to watch your Blu-ray movie on a Blu-ray player hooked to a big TV.


About David James
 Video ConverterConvert files from one format to another
 iPhone Data RecoveryRecover deleted files from iPhone, iPad
 Blu-ray CreatorBurn video & audio files to Blu-ray
 Blu-ray PlayerPlay Blu-ray, DVD, and movie files easily
 Blu-ray RipperRip Blu-rays/ DVDs to digital files
 Blu-ray CopyCopy Blu-rays/ DVDs to another disc


