How to Burn Videos from Final Cut Pro X to Blu-ray/DVD

David James
Updated on Aug 29, 2023
These days, people tend to watch movies & TV shows online or stream them right onto big smart TV via Internet video-streaming service providers like Netflix and Amazon. You pay a certain membership fees monthly and you will access to its library of online content and playback on Internet-connected devices like PC, Mac, mobile phones, tablets, game consoles and portable players.
Despite the trend, there is still a need sometimes to burn your favorite movie collections onto a Blu-ray or DVD disc, so that you will pop it into a standalone Blu-ray player and sit back to enjoy the movie on home theater with kids. In today's discussion, we are going to talk about burning movies exported from Final Cut Pro X to a Blu-ray disc on Mac computer.
Before the Blu-ray burning task, make sure you have exported the Final Cut Pro X project or clip to a common video format such as a QuickTime movie. If you haven't already done that, you can use this method: Select the "project" you would like to export in Final Cut Pro X, then in the menu bar choose File > Share > Master File (default) to export your project as a QuickTime movie file. It's important to note here that you keep the default settings to export at the highest quality since Blu-ray supports up to 1920 x 1080p of resolution.
For the purpose of converting Final Cut Pro X exported movie files to Blu-ray or DVD on a Mac, you have a couple of choices. Amongst them, Blu-ray Creator for Mac is our pick.
It's an easy to use program that lets you convert movie collections including video clips exported from FCPX and burn to a Blu-ray disc or physical DVD quickly and easily for fast results, but you can experiment with its built-in stylish menu templates and editing tools to create stunning results. You can even add your own music and photos for background enhance.
If you're on a PC machine and want to burn Blu-ray or DVD, please refer to its Blu-ray Creator for Windows.
How to convert videos exported from Final Cut Pro project to Blu-ray
STEP 1
Add videos exported from Final Cut Pro X into program
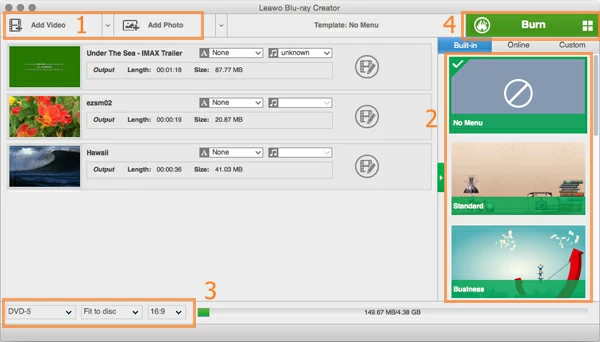
In Blu-ray Creator for Mac, first you have to choose the FCPX videos that you want to include on the Blu-ray or DVD disc.
You can hit "Add Video" on the top menu and pick your final Cut Pro X project videos and photo collections if you like, or just drag the source files and drop onto the program's blank area.
After the videos imported, you can see they display on the list, and there is a blue bar on the bottom telling you how much of space is left on the Blu-ray (or DVD) disc.

See also: How to burn high definition 1080p MP4 to Blu-ray disc on Mac
STEP 2
Customize your Blu-ray menu and menu text
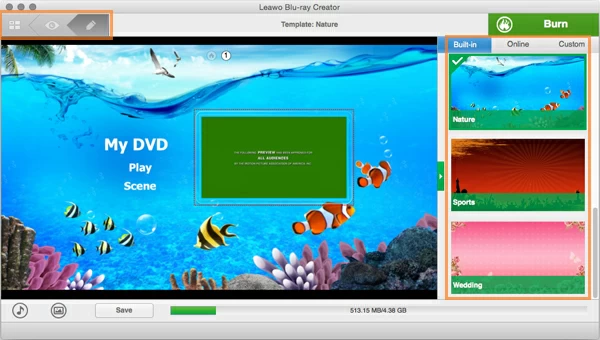
On the next screen, you will choose a menu from a "Built-in" list of available menu templates on the right hand portion or design your own interactive BD menu, or even get menus from "Online".
After that you can change the menu text, select font type and color, re-arrange the position of menu elements. Add background image and sound track are also supported via MUSIC and PHOTO icon on the lower left side of screen.
Go ahead and click the EYE icon (see top left in screenshot below) to preview the effect until you're happy with the results. Or else click the PEN icon to go back for further editing.

STEP 3
Configure output settings
Insert a blank Blu-ray disc into your computer's BD writer.
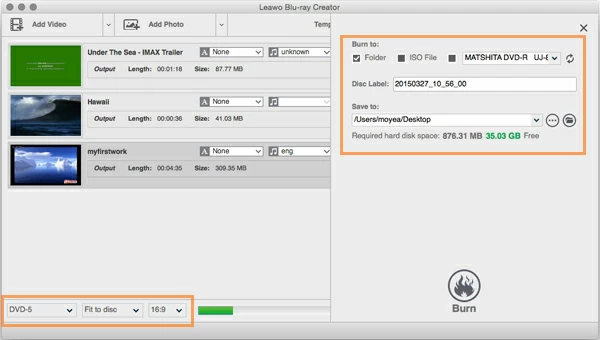
In this step, we need to set up some necessary output settings such as disc type, aspect ratio, burning speed.
Go to lower left-hand side of screen, in first drop-down box select a disc type from DVD-5, DVD-9, BD-25, BD-50, depending on the type of disc you insert previously. In the second box is burning speed options, "Fit to Disc" is suggested. Then, if you have a wide TV select the 16:9 in the third box, if not, use another 4:3 ratio.
Next, click the green "Burn" button at the upper right corner of the application interface, a pop-up window appears. From there you'll be asked to select an output media type: folder, ISO File, or Disc. If you intend to burn Final Cut Pro X videos to Blu-ray Folder or ISO for backup at the same time, you here check the option and specify a local path for saving the resulting file via "Save to...", In "Disc Label" you can change the name of the disc. By default, the day's date is put in this spot, but you can change it to anything.

STEP 4
Click "Burn" to start burning FCPX video files to Blu-ray (or DVD)
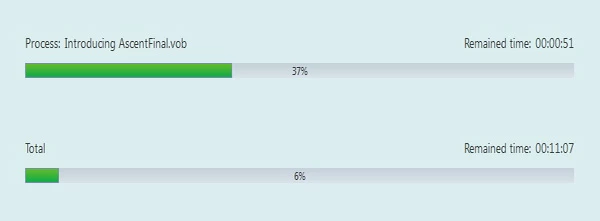
After all settings configured, again, click the "Burn" button to begin converting your videos exported from Final Cut Pro X to Blu-ray or DVD on Mac OS X.
The burning process will take a while to burn your movie files. Don't eject the Blu-ray disc until the process finish.
You're done! You'll have a nice looking playable Blu-ray. Now you can pop it into a Blu-ray player and watch on a big screen TV, or just play it via a Blu-ray player software on your Mac/ PC computer.

That's it! Hopefully, using the guide above you have been able to convert your videos exported from Final Cut Pro X project into a Blu-ray disc for playing on a BD player! Enjoy!


About David James
 Video ConverterConvert files from one format to another
 iPhone Data RecoveryRecover deleted files from iPhone, iPad
 Blu-ray CreatorBurn video & audio files to Blu-ray
 Blu-ray PlayerPlay Blu-ray, DVD, and movie files easily
 Blu-ray RipperRip Blu-rays/ DVDs to digital files
 Blu-ray CopyCopy Blu-rays/ DVDs to another disc


