H.264 Converter: Convert H.264 Files Easily

David James
Updated on Aug 29, 2023
H.264, also known as MPEG-4 AVC, is an industry standard for video compression. It offers significantly greater compression than the basic MPEG-4 compression, making it possible to produces higher quality video with smaller file sizes. H.264 video is often encoded with audio compressed with the AAC codec, and can be incorporated into several container formats such as MP4, MOV, AVI, FLV, etc. Due to its advantage of video compression and Internet transmission, H.264 is widely used on the Internet for video streams, broadcast of HD channels, as well as Blu-rays.
The emergence of H.264 has allowed video fans a better playback experience online and offline. However, there is often still the need to convert a video, encoded in H.264, into another format and vice versa with a H.264 video converter – sometimes for quality and sometimes for compatibility.
H.264 video converter: Windows, Mac OS X
Fortunately, there is more than one way to convert H.264 videos on Mac and PC's for any number of purposes. Video Converter does a great job of what it is intended to do. It offers a comprehensive solution to satisfy average user's video conversion needs. It can converts raw H.264 video to either Xvid, DivX, MPEG-4 or any other video, as well as converting your movie from media collection to H.264 video. The software combines exceptional conversion speed with high-quality output and incredible ease of use.
1. Ease of use. The H.264 video converter for Mac & PC opens to a clean interface with intuitive layout. Even inexperienced users can find their way around quickly to master all features of this app to convert H.264 files.
2. A large array of formats as input and output. The list of video and audio formats this PC & Mac H.264 converter supports is surprisingly long. You can convert anything from common MP4, AVI, WMV, M4V, AVCHD, MOV, h.264, mpeg-4, xvid, divx, MP3, WMA, AAC, AC3, to less common formats like VOB, 3GP, WebM, RMVB. And all of your output format options are clearly organized into categories: HD Video, General Video, 4K Video, 3D, TVs, and General Audio.
3. Presets selecting supported. The H.264 converter for Mac ships with a wealth of preset as output for popular devices like iPhone, iPad, Xbox One, PS4, Kindle Fire, Galaxy smartphones and other Android devices. This makes it easy for you to convert videos into other formats to be suitable for device of your choice perfectly.
4. Further tweaks on conversion settings. Advanced users may want to do more about video settings like bitrate, frame rate, resolution, sample rate, audio channels. The H.264 video converter understands this and offers you options to take more control over the video output, so you'll be able to set all those settings manually and get results you want.
5. Video editing tools available. You can do some basic video editing on a video with this H.264 converter on Mac and Windows. The program contains a basic array of video-editing filters that allow you trim, rotate, crop and adjust the visual effect of your video. You can add a logo or text caption as watermark to the video.
6. Speedy conversions. For those who're on a Windows machine, the H.264 converter can detect CUDA or AMD graphics card and allows enabling graphics acceleration, which makes conversion performance more faster.
7. Extra helpful features. The H.264 video converter for Mac/ PC also gives the ability to automatically shut down the computer after conversion, or open the output folder where saving the resulting files, change interface skin, and other options in Preference.
In this article, I am going to walk you through the conversion process of converting files to H.264 video on a Mac, you can also use the application to convert from H.264 videos to any other file format you like.
How to convert video to H.264 using H.264 video converter on Mac
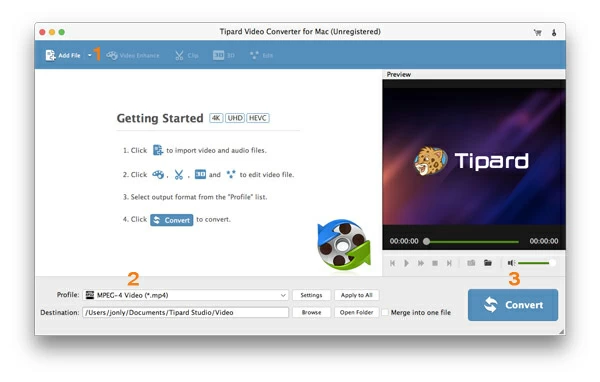
Stage 1 – Choose the kind of file you want to convert
This is the default window when this Mac H.264 video converter starts, simple enough for inexperienced users, while more advanced users can take advantage of its more powerful features behind the window.
In the left side of top menu, click "Add File" button to navigate and select videos you want to export as H.264 video from computer hard drive.
You can either use the drag-n-drop method to add your source files.
Stage 2 – Pick the appropriate format from "Profile" menu as export file
When you have completed your selecting of source files, click "Profile" drop down menu in the lower left-hand side. From there, the H.264 video converter for Mac offers a large number of output options to choose from.
Since H.264 is just a video codec used for encoding videos in a container format such as MP4, MOV, AVI, so we would have to select a container format that supports H.264 first, then specify H.264 as its video codec.
For computer and device playback we'd choose MP4 for maximum compatibility. To do this, head to "HD Video" category and expand its list. scroll down until you find HD H.264/MPEG-4 AVC Video (*.mp4), and pick it.
Afterward, next to "Profile" drop-down menu click "Settings" button to get into Profile Settings window. There are plenty of advanced options available for complete customization of the conversion settings.
Experienced users may tweak any of settings to their liking. For our purpose in this example, we just ensure that "H.264" is selected in "Encoder" box in Video Settings section.
Device-oriented presets available
As seen for the screenshot below, The H.264 converter ships with a vast array of device presets. If you want to convert your movie to watch on a device, like iPad Air for example, there is no need to select a specific iPad friendly format and then tweak its conversion settings, you just go to the Apple iPad category, and in its expanded list select iPad Air profile.
Almost all of popular multimedia devices like iPhone, iPad, Kindle Fire, Android phones, tablets, game consoles have their presets in the list.
See More: How to play MOV onto Amazon Kindle Fire.
Edit the video if you like
There are even more options available on the top menu. By clicking the "Edit" or "Clip" icon, it will get you into the video editing window.
The editing filters allows you to trim the video to remove unwanted extras by shaving the beginning and end time of file, select on your own how much the crop you want to be to get rid of black bars, remove dirt-like noise to make your video more cleaner, add personal watermarks on the video, and more.
There is a preview window to make it easier for you to see the editing effect in real time.
Stage 3 – Start converting H.264 video
Now that you have everything ready to go, click "Browse" in the bottom center of the screen next to "Destination" box and select the folder where you'd like to save the output file.
Afterward, click the blue "Convert" button in the bottom right hand side, the H.264 conversion process will start on your Mac.
You can track the progress of the H.264 conversion process via the progress bar that appears at the bottom of every video item in the process queue. Whether you convert files to H.264 video or vice versa, the process can take a while, depending on the length of the source videos and the power of your machine.
Once complete, you can click the "Open Folder" next to "Browse" or tick Open output folder option in the process window to see the newly-minted files.
The program that's running on Windows even supports nVidia CUDA and AMD acceleration technology, you'll benefit from very fast encoding if your graphics card is CUDA-capable or AMD-capable.
About David James
 Video ConverterConvert files from one format to another
 iPhone Data RecoveryRecover deleted files from iPhone, iPad
 Blu-ray CreatorBurn video & audio files to Blu-ray
 Blu-ray PlayerPlay Blu-ray, DVD, and movie files easily
 Blu-ray RipperRip Blu-rays/ DVDs to digital files
 Blu-ray CopyCopy Blu-rays/ DVDs to another disc