How to Convert H.264 Video to WMV Format

David James
Updated on Aug 29, 2023
H.264 is one of the most popular video codec for HD movie content on the planet. It vastly improves image quality at lower file sizes than standards such as MPEG-4 and MPEG-2. In Mac environment, Apple has officially adopted H.264 as the format for its QuickTime. Sometimes, you may come across the x264 movie files that're downloaded from Internet, the name of a popular freeware encoder for the H.264 format.
Even though H.264/AVC videos are always included in a MP4 or MKV container that's playable on a number of devices and apps, there is a necessity for you to convert a H.264 video to WMV format when it comes to working it with a Windows system. Fortunately, turning your H.264 movies into a WMV format on both Mac and PC is now easier than ever with the help of file conversion utilities.
H.264 video converter software
The Web has plenty of programs available for converting H.264 videos into WMV and other formats. If you often find yourself needing to convert videos and keep minimum adjustments to output settings, Video Converter should be the solution you've been looking for. As its name indicates, it's capable of converting H.264 to WMV on Mac OS X and Windows, and gives you the ability to take care of any source as input and export it into virtually every popular format you can think of.
Other noteworthy features include a wealth of device presets that's suited to the device you'll be viewing on, and editing filters at the top menu you can manually edit the video to enhance video looking.
For example, converting an H.264 video files into WMV format in Mac is illustrated below.
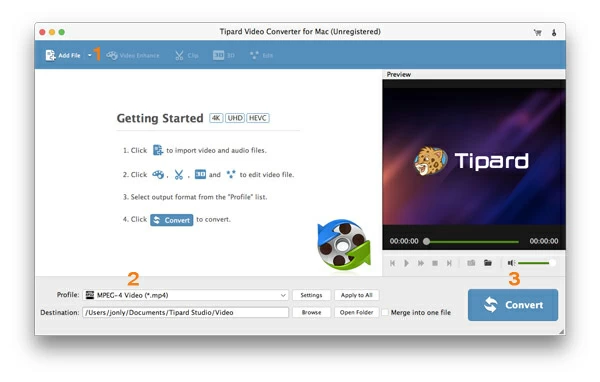
Stage 1 – Load H.264 movie files onto the program window
Once you have installed the program on your computer, fire up it.
Now, you should see the main interface of this H.264 to WMV converter appear. It looks rather clean at first, as we haven't any video items selected yet.
The application has the drag-n-drop simplicity. You're able to drag a bunch of H.264 files and drop onto the program window.
Alternatively you go with the traditional way to add H.264 videos for conversion. Click the small icon marked "Add File" at the top left corner of the window, browse your local folder and select the H.264 files.
Stage 2 – Choose WMV from "Profile" list
The Mac app supports almost every conceivable generic video and audio format as exporting format.
In this article, we just want to transfer H.264 to WMV video format. At the lower left side of the screen, hit the "Profile" drop-down list, this will get you into a format-choosing panel as image shown below. Head to "HD Video" column, and select HD WMV Video (*.wmv).
This step is not necessary.
The software attempts to hide the complexity advanced features expose, as the default settings of format works okay for most people. If you're a power user, though, you can click on the "Settings" button next to "Profile", in the new window you're allowed to tweak any set of values to control the output WMV video quality.
For this operation, we're making no adjustments to anything in the window. This is a straight conversion from h.264 to wmv format, so we'll leave everything as is.
Click on OK once you are finished.
Preset choosing
As you can see in the left pane there are a great selection of device-specific presets available to choose from. These presets will let you quickly transcode your movie files, without delving into video settings, to something better suitable for device of your choice.
Video editing filters
Performing video editing on the video is optional.
This H.264 to WMV converter for Mac also includes ability for you to edit video such as removing black bars on the sides, cutting the video to highlight a part, adding text and other effects to the video, which would make the video looks more awesome.
Stage 3 – Converting H.264 videos!
After you have everything configured, click on the button marked "Convert" at the bottom right-hand side of the program window. The process H.264 to WMV video converting on Mac will begin. Just let the app takes care of the rest.
Again, you'll see a new window come up so you can track the progress. Depending on how fast your computer, and how many source files in the queue, it may take quite a while to convert your H.264 videos on Mac.
Once the conversion completes, open the output folder and copy the new WMV files to where it needs to go.
Have a good time with new WMV movie files!
About David James
 Video ConverterConvert files from one format to another
 iPhone Data RecoveryRecover deleted files from iPhone, iPad
 Blu-ray CreatorBurn video & audio files to Blu-ray
 Blu-ray PlayerPlay Blu-ray, DVD, and movie files easily
 Blu-ray RipperRip Blu-rays/ DVDs to digital files
 Blu-ray CopyCopy Blu-rays/ DVDs to another disc