How to Transfer AVCHD Footage onto iTunes

David James
Updated on Aug 29, 2023
Today's affordable digital consumer cameras/ camcorders have given people more flexibility to capture clear and sharp videos. However, unlike digital photos, there isn't a common standard for videos. If you try to import camcorder footage with – rather than a more common MP4 format – highly compressed AVCHD (m2ts, mts) format into iTunes, things get tricky. Apple iTunes and even iOS devices won't accept AVCHD. And therein lies question for today: how to add AVCHD videos into iTunes for playback onto Mac Apple TV, iPad, iPhone?
What is AVCHD
AVCHD is commonly used to record videos in Sony, Canon, Panasonic and JVC. It adopts MPEG-4 AVC/H.264 codec (Dolby AC-3/ linear PCM audio codec) to encode videos, and the footage can thrive with full HD 1080/60p resolution. The AVCHD file will exist with .mts extension on camcorder structure, or in .m2ts after import to computer. Being its excellent image quality, AVCHD is perfect for burning to Blu-ray for HDTV playback.
But, let's face the fact that Apple iTunes has a limit support of video formats: *.mov, *.m4v, *.mp4, DV, and AVI (Mjpeg). Files in AVCHD (*.m2ts, *.mts) format can be a problem when your media manager is iTunes. In order to get your AVCHD videos imported into iTunes on Mac and PC, we need to first convert these AVCHD footage into something acceptable by iTunes.
Fortunately you have so many choices today to make the AVCHD conversion success, so that you then can transfer it to iTunes library. Our favorite is Video Converter.
It's a fast, richly featured video conversion tool that can convert videos from one format to another, including AVCHD to iTunes file type. It keeps thing simple with a very friendly interface, but advanced options lay right under the hood, where you can apply filters to edit the video, configure output parameters, select/ remove subtitle and tracks, and so much more.
Download the appropriate version for your machine. I will take the Mac system for example here.
How to convert AVCHD videos and add to iTunes on Mac OS X
Stage 1 – Load AVCHD source files onto the program
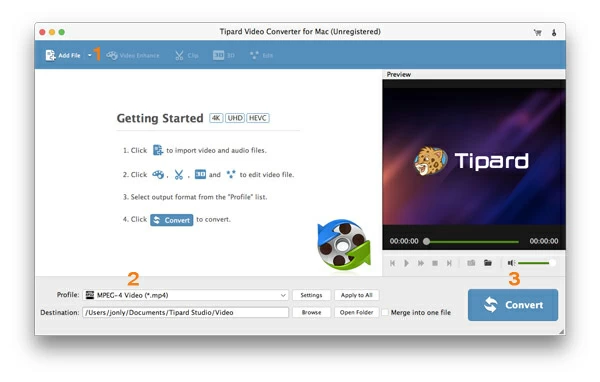
Once you open the converter you should have something that looks this
Select "Add File" at the top of the window. If you would like to convert multiple AVCHD files for iTunes, while the file browser is up, highlight one AVCHD file, press and hold the Ctrl key, then click each of the other files you want to select, and then click open.
Alternatively, drag and drop your AVCHD video files into the middle of the program window.
Stage 2 – Under "Profile" drop-down menu choose MP4, MOV or M4V.
From the "Profile" dropdown, you select "HD H.264/MPEG-4 AVC Video (*.mp4)" or "HD MOV Video (*.mov)" under HD Video category to export to MP4 or MOV format.
There are several other output formats available on the left side of window, where users can choose to output their (AVCHD) video/ audio files as.
Use preset instead
If your purpose of transferring AVCHD movies to iTunes is to sync them with iOS players, iPhone or iPad for instance, to save some time, you can press one of preset categories to reveal a list of corresponding device profiles. Choose your desired device icon from the profiles on offer. The program will then automatically set appropriate settings accordingly to that device.
See How to watch AVCHD movies onto iPad for a tutorial.
Stage 3 – Click "Convert" button to begin converting AVCHD for iTunes
Once you have configured the output you need, click the "Browser" next to "Destination" box at the lower left side of program windows, and check that the output folder is pointing to the location where you want to save the new iTunes file converted from AVCHD.
Now press blue "Convert" button on the bottom of screen, the program will start converting AVCHD recordings to iTunes files on Mac or PC. Progress bars will show the status of each AVCHD file's conversion.
Read next: How to extract audio files from MOV to .mp3 format in Mac
You can check the "Open output folder" option on the bottom (see below) to show your resulting files after the conversion completes.
The last step is just adding created video files from your computer to your iTunes library. You can do this by dragging one or multiple files to the iTunes window, or going to choose File > Add to Library in iTunes' interface, locate a file or folder, and click Open.
Happy AVCHD to iTunes converting on Mac OS X and Windows!
About David James
 Video ConverterConvert files from one format to another
 iPhone Data RecoveryRecover deleted files from iPhone, iPad
 Blu-ray CreatorBurn video & audio files to Blu-ray
 Blu-ray PlayerPlay Blu-ray, DVD, and movie files easily
 Blu-ray RipperRip Blu-rays/ DVDs to digital files
 Blu-ray CopyCopy Blu-rays/ DVDs to another disc