How to Add MKV (1080p, 720p) Movies onto iTunes

David James
Updated on Aug 29, 2023
iTunes is a media management software that lets you organize and play the digital video & audio files you already have, as well as purchase music albums, hot movies and TV shows available on the iTunes Store. You can even use it as an online radio broadcaster to tune in to Beats 1 radio. It works for both Mac OS X and Windows operating systems.
The problem is, if you're trying to copy a digital video into iTunes, you know that by default it only accepts only a limited range of file formats as input. You would need to ensure that the file ends in a .mp4, .mov, .avi (mjpeg) or .m4v extension. Definitely, Matroska .mkv is not in the list.
Add a MKV into iTunes library
If you take Apple iTunes as your media library, you probably want to put those MKV into iTunes once you grabbed them from online, but you know iTunes doesn't recognize this uncompress matroska .mkv file type. What do we do?
Luckily, you do NOT need to be a tech guru when it comes to facing importing issue of MKV video files to iTunes. You just need to have a tool that allows you to convert MKV to a iTunes friendly file – MKV video converter.
If you're looking for something simple and efficient, then you may stick with Video Converter. It supports 150+ input video which cover almost all popular video formats and converts to any type of format you desire without a hitch, including MKV to iTunes, under Mac OS X and Windows. If your purpose of importing MKV into iTunes library is just sync to your iOS player like iPad tablet or iPhone, you can even select from its built-in Apple presets, without wasting time in configuring related settings of your iOS device.
The software come with extra bonus features, if you know what you're doing, such as fine-tune conversion parameters including frame rate, resolution, codec, bit rate, sample rate, etc. Basic editing is also supported including cropping, cutting, merging, splitting, and more.
At this point, we're going to assume that you've installed the application on your platform of choice, so you should be ready to convert the MKV to iTunes readable file.
How to convert 1080p/ 720p MKV to copy into iTunes on Mac and PC's
(Want to import MKV files into your iOS device like iPhone or iPad directly without though iTunes? Of course you can! iTransfer (Mac download, PC download) such a simple tool designed for that purpose. It lets you to transfer any type of media files to your iOS device, including music, playlists, movies, photos, podcasts, etc. without a hitch. It also gives you ability to transfer contents amongst iOS, Android, iTunes, and Mac/PC.)
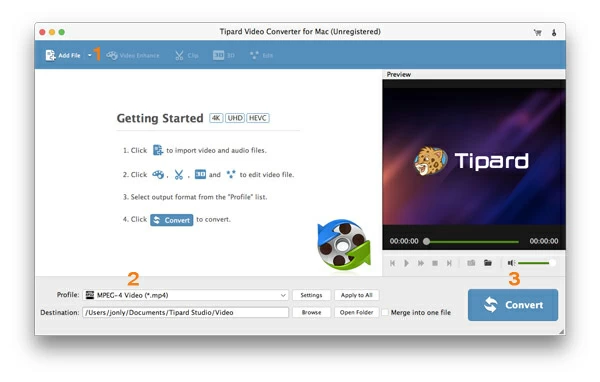
Open the software for the first time and you will be greeted with a very clean interface with basic instructions in the middle area.
Stage 1 – Add your quality MKV files to the software
In the top menu where it states "Add File", click it and then in opening file-manager dialog box, choose the MKV movie files you wish to add to iTunes from its respective save location on your computer.
When you selected your MKV files, the related info about the file such as length, resolution, audio track, subtitle shows up in the list.
Stage 2 – Select iTunes acceptable format from "Profile" menu
After successfully opening the MKV videos, it's a case of choosing which iTunes format to convert your MKVs to. Generally, MP4 (or MOV) is the best choice as it has become a common denominator across multiple platforms from Mac, to Windows, to Linux, as well as iOS and Android.
To do this, go to the bottom side corner where it states "Profile", select HD H.264/MPEG-4 AVC Video (*.mp4) under "HD Video" column. Since iTunes have a native support of MOV and M4V, here you can also opt to go for HD MOV Video (*.mov) and M4V MPEG-4 Video (*.m4v) as output format.
I, and I'm sure many other users also, don't know the exact settings of video which will play along well with the iPad Air 2, for example. This MKV converter software understands this and ships with pre-defined preset profiles for lots of multimedia devices, including Apple products.
So, if your purpose of putting MKVs onto iTunes is just for watching the videos on an iOS player like iPhone, iPad tablets, instead, you can select the preset option that matches your device name from the list. The software optimize the output settings according to the preset selection automatically.
For example, the iPhone 6s Plus/6s H.264 HD Video (*.mp4) preset profile built in the list uses the H.264 video Codec and AAC audio, which according to the official iPad Air 2 specs. And adopts 8000 kbps for bitrate, 30fps for frame rate, as well as 48000 Hz for sample rate. Note that there are other iPhone profiles available.
The program also offers options to please advanced users. Clicking the appropriately-named "Settings" button next to "Profile" brings up a dialog that lets you fine-tune each conversion settings. You can downscale your MKV from 1080p to 720p, for example. Other options including bitrate, codec, sample rate, frame rate are available.
You should be careful what you change here, as this will affect the file size and image quality of the resulting file.
This step is optional.
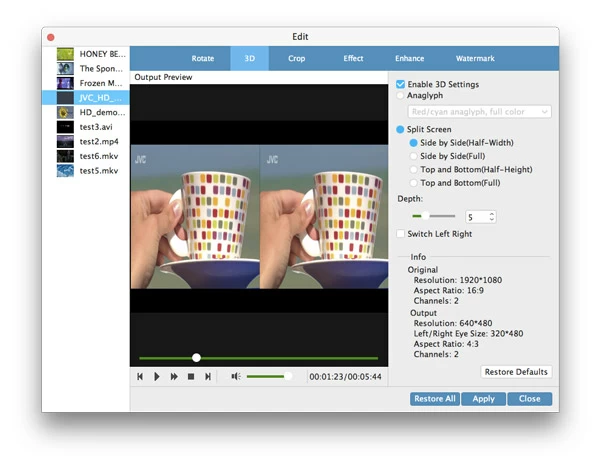
Edit your MKVs before converting to iTunes for better-look result
If your original MKV has black bar on the sides, or you plan to put text watermark on it, you can head over to the top menu and click the "Edit" button to accomplish those tasks.
This MKV to iTunes converter for Mac/ PC allows you edit the video quickly. Six tabs of filters are available: Rotate, 3D, Crop, Effect, Enhance, and Watermark.
The dynamic Preview window shows results in real time as you prepare your video file for editing.
Note: the "Clip" feature is listed in the top menu of main screen, and "Merge into One" option is in the bottom.
Stage 3 – Start converting MKV to iTunes acceptable file format on Mac and Windows
By default, the resulting file will be saved in /Users/[your name]/Documents/..., on your computer, you can modify the path by clicking the "Browse" in "Destination" field. This can be wherever you want as long as you will remember it.
Now, hit "Convert" blue button in the lower right-hand corner and wait for the program converting 720p/ 1080p MKV to iTunes file in your Mac or PC's. The MKV conversion is not instant but definitely worth the wait.
In the case of conversion, file size of the original MKV sources, your computer processor, output settings you configured, and other factors can greatly influence the time it takes to perform the conversion. You can always monitor the progress and estimated time via progress bars.
Stage 4 – Drag the new created files and drop into iTunes library
Once MKV conversion completes, you'll be able to navigate to the location you previously set to retrieve you newly-minted iTunes files. You can then import the files into iTunes and transfer to your iOS device to watch them on the go.
Enjoy!
About David James
 Video ConverterConvert files from one format to another
 iPhone Data RecoveryRecover deleted files from iPhone, iPad
 Blu-ray CreatorBurn video & audio files to Blu-ray
 Blu-ray PlayerPlay Blu-ray, DVD, and movie files easily
 Blu-ray RipperRip Blu-rays/ DVDs to digital files
 Blu-ray CopyCopy Blu-rays/ DVDs to another disc