How to Convert MKV to QuickTime File

David James
Updated on Aug 29, 2023
If you've been around Mac computer for a while, then you're likely familiar with OS X's default video playing application – QuickTime player. It's capable of streaming Internet HD videos, hot movie from iTunes Store, and personal media that are in .mp4, mov, m4v and Mjpeg file format, but it can't play everything. If you've a bunch of Matroska MKV format files (5.1 AC-3 and/or 5.1 DTS audio) in media collection and want to play on QuickTime software on Mac, you'll get an error message "invalid file extension".
Apple QuickTime player currently still can't play MKV movie (HD video, 720p/1080p) files – an increasingly popular format you come across on the Internet, nor does it has support for video content that includes AC-3 video (99% of mkv videos).
MKV to QuickTime Converter software
Although you can't play MKV videos in QuickTime on Mac OS X directly, the web has quite a great selection of video conversion apps that let you convert MKV to be able to play onto QuickTime without any issues.
Amongst them, Video Converter for Mac is our pick. It's a little handy app for converting 4K, HD and standard definition videos into pretty much any video files you might want. And it also comes packed with an impressive feature – presets for portable devices, such as iPhone, iPad, Android phones, tablets, PSP, Xbox, etc. That's really convenient to simplify the converting task.
If you using a Windows version of QuickTime player and need to convert MKV to QuickTime player, you can refer to its PC equivalent Video Converter for Windows. The version has CUDA and AMD accelerate technology integrated, making video converting process faster while using less CPU resources.
As an example, this guide demonstrates how to convert movie files that are in matroska .mkv format to QuickTime video files on Mac OS X with this application.
Workflow: how to convert MKV videos to QuickTime for Mac
Stage 1
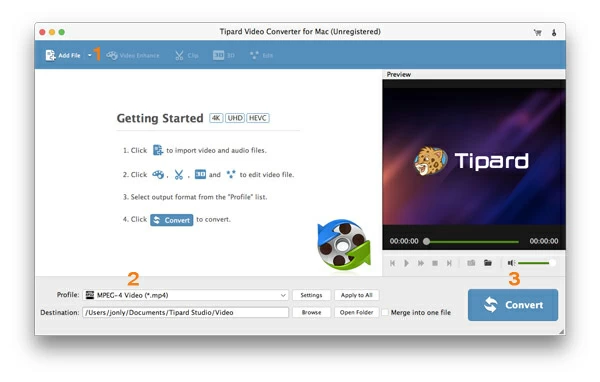
When the installation is finished on your Mac, click the icon of the software to open it.
The interface at the first glance is simple, along the top menu are five buttons where you can manipulate essential functions, but there are advanced options behind it.
Simply drag multiple MKV movie files into the program window with CTRL key, this MKV to QuickTime converter for Mac will automatically convert them all with one click, so you don't have to repeat the process for each.
Alternatively, click the "Add File" at the top menu and browse your local folder that includes MKV files you wish to add for conversion, select them and click Open. This goes for Windows version of the software, too.
Perform basic video editing on the video
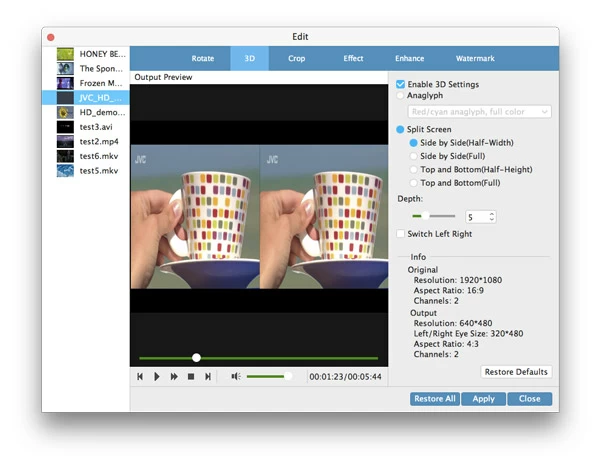
If you wish, you are free to carry on via "Clip" and "Edit" options at the top menu to edit and add effects to your video. By clicking the "Crop" tab in the editing window, for example, you can remove edge scan lines or black bars of a video to better fit different playback devices' screen.
You can also do others: trim, rotate the video, put watermark, add 3D effects, etc..
Stage 2
In this step, you're required to choose a QuickTime acceptable file as exporting format.
If you convert MKV to QuickTime just in order to play the video on QuickTime player on Mac, you can simply choose a QT friendly format such as HD H.264/MPEG AVC Video (*.mp4) or HD MOV Video (*.mov) from "Profile" drop-down menu at the lower left corner of the interface.
If you've got an Apple device like iPad Air or iPhone 6s plus (2015), a good choice is to go with the device-targeted preset profile under "Apple iPhone" or "Apple iPad" (see our article about how to play MKV on iPad), which has everything (codec, resolution, bitrate, size) optimized to be suitable for device your chosen.
Also, the "Profile" window supports everything from AVI, WMV, MOV, MP3, WMA, M4A, MKA, AAC, AC3 to smartphones, Xbox One and PS4 output, making it dead simple to pick the right file type.
As a universal application, the MKV to QuickTime converter gives a balance between novices and experienced users. If you do need more fine control to get the best conversion possible, though, the tool provides access to all the video & audio settings by clicking on the "Settings" button next to "Profile".
For example, you could compress your full HD 1080p MKV movies into 720p or 480p videos to cut down the final output size via "Resolution" box (this on the contrary could result in losing the original quality of the movie).
The more you know about the video and audio settings, the more tweaks you can do. This part is pretty open to experimentation, you can leave all of them alone.
Click OK if you have made changes on this screen.
Stage 3
When you have set up all of conversion settings, just modified the output path. You click "Browse" next to "Destination" field at the bottom left of the screen, choose a location for the converted files.
Now click the blue "Convert" button at the bottom of the screen and wait. Make yourself a cup of coffee as you'll have a bit of a wait while the application takes care of its MKV to QuickTime converting process on Mac. It's worth noting that how big the original MKV files are, your computer hardware, and conversion settings, etc. can greatly influence the time it takes to perform the conversion.
The software shows you a windows with progress bars where you're able to track the converting progress.
You can tell this MKV converter application to open the directory where saves the resulting files after the conversion task finishes by checking "Open out folder" box in the window.
Also, it comes with ability to automatically shut down the computer after converting MKV videos to QuickTime file on Mac through "Preferences" option, this is really useful when you put your movie files into the tool and converting them over night.
After the conversion process completes, you can now drop the newly minted files onto QuickTime and stream them on your Mac.
About David James
 Video ConverterConvert files from one format to another
 iPhone Data RecoveryRecover deleted files from iPhone, iPad
 Blu-ray CreatorBurn video & audio files to Blu-ray
 Blu-ray PlayerPlay Blu-ray, DVD, and movie files easily
 Blu-ray RipperRip Blu-rays/ DVDs to digital files
 Blu-ray CopyCopy Blu-rays/ DVDs to another disc