MOV Converter: Convert to and from MOV Files

David James
Updated on Aug 29, 2023
There are dozens of digital video formats in the movie industry. Whether you get video files from iMovie project or Final Cut Pro project or if you're downloading videos from the Internet on your Mac, chances are that you will come across .MOV files — an multimedia video container format used in Apple's QuickTime program.
Since most media players have a support of limited file types, sometimes you will have to take your MOV videos and convert to a more accessible format, or vice versa. Thankfully, no matter what the situation, there are always ways of converting MOV files to another format that's workable on media player you own, or convert your favorite videos from media library to MOV format, and that is precisely what we will discuss today.
MOV video converter — Mac OS X, Windows
If you intend to convert MOV files on Mac/ PC to and from the vast majority of formats, it's unlikely you'll find a utility more versatile and powerful than Video Converter.
The software converts MOV for sure but it does not stop at that. It supports converting every format under the sun: including the most common used video and audio files like MP4, MOV WMV, AVI, M4V, MKV, and less-than-commonly used formats including FLV, MTS, M2TS, VOB, MPEG, WebM. Literally too many to list here, but includes every format you can think of. The main features are as follow:
1. Friendly. The MOV converter for Mac & Windows sports a clean and simple interface, along with its buttons clearly labeled. You have no trouble navigating the program and don't need the Help file.
2. A huge number of output format options. No matter what output format you're looking to convert your MOV files to, or convert video to MOV, you'll be happy with the options included in this MOV video converter. You can convert between MOV, AVI, FLV, WMV, MP4, M4V, MKV, 3GP, ASF, WebM, VOB, MPEG, RM and more.
3. Extract audio tracks from MOV or other files. There are also options for extraction of audio file from MOV video or your other movies and convert into MP3, WMA, M4A, AAC, AC3, FLAC, APE, OGG, WAV, etc.
4. Device-optimization profiles available. This PC-based and Mac MOV video converter makes it super-easy to convert your favorite movies from media library into correct format tailored to give the best picture and size on device you own — whether it's a iPhone, iPad, Kindle Fire, Android smartphones or TVs, game systems or others
5. Convenient controls of output. The MOV converter for Mac/ PC not only allows you to pick from a great selection of output profiles, but it also offers flexibility with its extra features. For example, you can change the bitrate, codec, channels, resolution, frame rate, sample rate of the output video.
6. Nice editing features. Before you start MOV conversion, you can edit the video, such the ability to trim parts of the video to get the exact section you want, remove the black bars on the edges, add your personal watermark, as well as adjust brightness and contrast. Though this doesn't really add a lot to this PC/ Mac MOV converter's main functionality, it was fun to play around with.
7. Fast conversions. One of the more unique aspects of this MOV converter is it has the ability to take advantage of all available processing power to accelerate conversion time. You can activate nVidia CUDA and AMD acceleration option in the Preference if your computer comes with that graphic card.
8. Batch conversions. The MOV converter for Mac / Windows has the support of bulk conversion feature, which is very convenient for users who want to handle a full folder or large batches of files at one time.
Now, download the program on your computer, run the setup.exe or .dmg file and take all the default settings.
The following tutorial will guide you through the steps required to convert a video to MOV on Mac, or vice versa.
How to convert MOV files using MOV converter for Mac software
Stage 1 – Select the files you want to convert
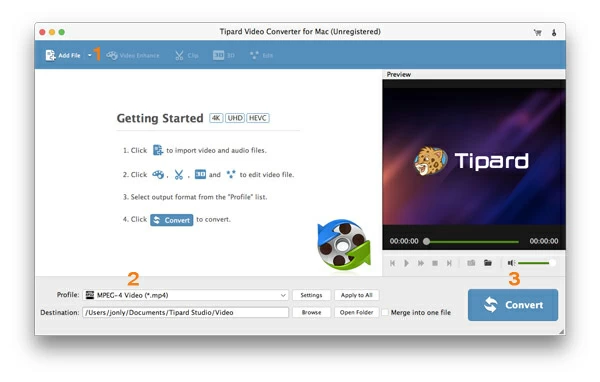
Open up this MOV converter for Mac. It sports a visually appealing interface that's simple and easy to navigate—Even an novice can find his/her way around quickly and complete basic conversions. I have highlighted a few key options that you'll need to convert a video to and from MOV in any situation.
To select the video you want to add for conversion, click "Add File" button. In the opening dialog box, locate the video files from the folder on your computer, select them and press Open.
This Mac MOV converter comes with a "Merge into One File" option in the lower right corner next to "Convert" icon, which allows you to join up multiple videos to have one big merged file. This is very useful if you want to make a single file from a number of small source clips with short duration.
Once selected, the videos will show up in the main window of the MOV converter, along with basic information such as the file name, file format, resolution, duration and audio track.
Stage 2 – Choose your desired output format and other specs you want to produce
The next thing you need to do is select what format you want to convert to from the list of available formats in "Profile" drop-down menu located at the bottom left side.
Generally, if you want to use this MOV video converter for Mac to convert QuickTime .mov files to a more manageable format, MP4 is the best option as it's the most widely supported on PCs as well as multimedia devices including smartphones, tablets and game consoles. You can also choose to convert the MOV to .wmv format for use on Windows platform, or another .m4v file type for Mac usage.
Or if you want to convert videos into MOV format on Mac OS X, just choose MOV profile under "HD Video" category from the list.
Related: How to Convert from WMV to MOV on Mac OS X.
It can be as simple as going straightly to Stage 3 in this article and pressing "Convert" button to begin converting your videos to and from MOV format on Mac, or you can click the "Settings" button (next to "Profile" menu" to get into profile settings window where you can customize any of advanced parameters related to the video to suit your needs, as shown below.
For most of users in most situation, you don't have to change anything here as the defaults (bitrate, frame rate, codec, resolution, aspect ratio, channels, sample rates, etc.) are optimized already.
Device-oriented presets available
The MOV video converter also includes presets that do a superb job of converting video for play on popular devices, everything from Apple to Android devices and the diverse bulk of media players in between. You simply click your manufacturer and choose your device preset profile from the list, everything will be optimized automatically.
For example, if you want to convert movie to watch on an iPhone 6 Plus, you just head to "Apple iPhone" category, and in its expanding list, scroll down until you find the iPhone 6 Plus preset profile and choose it. The same goes for other devices.
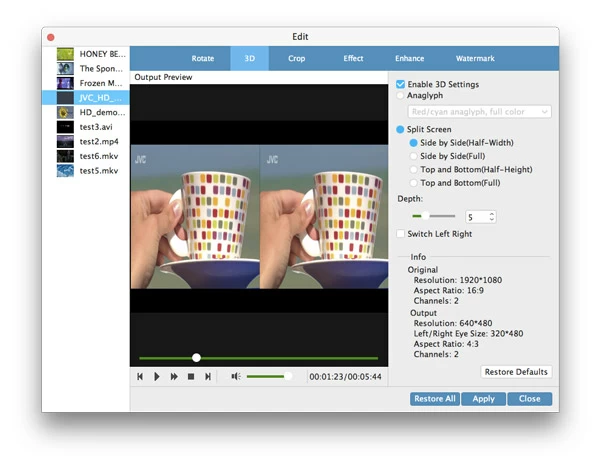
Video editing available (optional)
Another bonus feature of this Mac MOV video converter is it has an integrated video editing capability where you can enhance the video. It may not be as advanced and powerful like those professional video editing software including Sony Vegas, Final Cut Pro, or Adobe Premiere CC, but they'll take care of any basic editing tasks you need accomplished like rotating, trimming and cropping the video, adding effects such as a watermark, text overlay, etc.
All those can be done through the "Edit" and "Clip" icon on the top menu of the main screen.
When you are finished editing your video click the "Apply" button and close the window.
Stage 3 – Begin MOV conversion
Before you start the MOV converting process, you can opt to tell the program where the resulting files should be save. Here I'm leave the default path /Users/[your name]/Documents/... alone in "Destination" box at the bottom left side, but you can change it anywhere.
When you're ready, press the big blue "Convert" button in the bottom right corner, and you're good to go. The MOV conversion on Mac will take a while, depending the number of files that you're converting, as well as the length of source files. You may go for a walk or something else.
Also, the "After Done" option at the bottom of the process window asks how you want the software do after the conversion. You can tick the "Open output folder" so the folder where saves the resulting files will open in front of you.
About David James
 Video ConverterConvert files from one format to another
 iPhone Data RecoveryRecover deleted files from iPhone, iPad
 Blu-ray CreatorBurn video & audio files to Blu-ray
 Blu-ray PlayerPlay Blu-ray, DVD, and movie files easily
 Blu-ray RipperRip Blu-rays/ DVDs to digital files
 Blu-ray CopyCopy Blu-rays/ DVDs to another disc