How to Convert MOV to AVI File Format

David James
Updated on Aug 29, 2023
Scenario: You shot some of footages with camcorder on a long trip, they are saved in .mov format with HD 1080p quality, and you want to put them onto your AVI portable player for watching on the go. Now you go looking for an effective piece of software to convert the MOV to AVI files on a Mac machine or PC.
We do understand the fact that the AVI is no longer a mainstream file format in almost all cases. It has been replaced by more modern formats like MP4, WMV, MKV and QuickTime MOV which have a better performance in compression rate and image quality. Despite all this, AVI is still popular for its widespread support by large numbers of devices and applications. Compared to the AVI format, the Mac-centric MOV is lack of compatibility once you want to play it on non-Mac around your home or stream on a non-Mac player.
Whether it is to convert QuickTime MOV file to AVI Xvid file on Mac / Windows, to DivX *.avi, or to h.264 *.avi file, you'll need a video conversion tool to process your QuickTime MOV files into whatever format you need.
For the purpose of this, Video Converter is our suggestion. It is a handy application that lets users convert a wide range of video files to various other movie files that are in different types of formats on Mac and Windows.
Aside from the simple MOV to AVI or other video conversion, you can also use the program to rip the video and extract the audio sounds to save in popular audio files such as MOV to MP3 in Mac, WMA, AAC, M4A, FLAC, OGG and more. Audio to audio conversion is supported as well. Some of advanced features are available including preset selecting, video editing, output adjusting and more.
To help you quickly finish the process, this article will walk you through the steps necessary to convert MOV files into an AVI format for Mac and Windows computer.
Stage 1 – Install the Video Converter
Click the link above to download the correct version for your computer, follow the instructions of the setup wizard until it is done.
Without a complicated design of interface, the program puts options you could possibly frequently use on the top menu to save you time.
Stage 2 – Import MOV movie files
To add a MOV file to the program, click on the "Add File" button on the left side of top menu, navigate to the folder where your MOV is and then click it to add. Do the same thing if you want to add other movie files. Or, directly drag the .mov files you want to convert and drop onto the program.
Since this MOV to AVI converter supports batch process, which means multiple files can be converted in one time, you can add several MOV files to the program.
Related: see how to convert MOV to MP4 on Mac if you want to convert the files to a more popular MP4 format.
Stage 3 – Choose the video/audio output
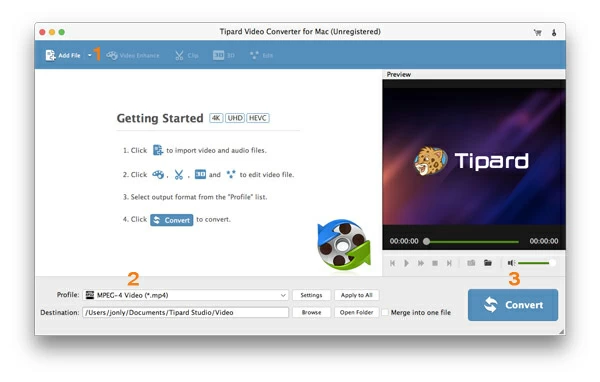
In this step, you will have to select the output container Format to export your .mov files in.
Click on the "Profile" button on the lower left-hand side of program screen. A drop-down list appears to bring up the Format profile options.
Next, select General Video > AVI Video.
Stage 3.1 – Adjust the output settings (optional)
Click the "Settings" button on the lower center of screen (near "Profile"), it will open a new window where encoding options are available for you to control manually.
You could choose to change nothing to the default profile settings in the window as they are optimized already. But if you like more control, then you'll configure them according to you need.
For example, In Video Codec field, there are Xvid, h.264, mpeg4, mjpeg, ms mpeg4 v2, ms mpeg4 v3 codecs available for you to choose from to encode video in AVI container file. Other options including bit rates, aspect ratio, resolution, frame rate are available as well.
Press OK to save settings and close the screen.
Stage 3.2 – using presets
When you open the Format profile window, you will see a Device tab, in which there are a group of device-configured profiles sorted by brand (Apple, Sony, Samsung, HTC...). These profiles make it easy for you to convert (MOV) video streams to mobile devices such as iPhone 6, Apple TV, PS4, Xbox One. When you pick it as output, all relevant parameters will be optimized accordingly.
To make video conversion easier next time, you can also set a custom preset and save it in "Custom" tab. What you need is configure the output settings in Stage 3.1, and then save it with a new name.
Also see - how to download videos off YouTube and save as .mov file on Mac.
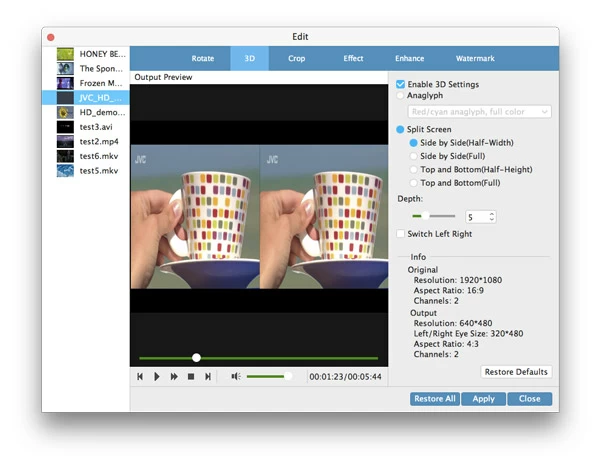
Stage 4 – Edit the video (optional)
By clicking on the Edit icon on the top toolbar of the GUI, a video editor will allow you to edit the video. On there, you can trim up video to eliminate the boring parts, crop video to remove black bars, put special effects and more.
Stage 5 – Convert MOV to AVI format
Now, click blue "Convert" icon on the lower right hand of main screen, the process of converting QuickTime mov to AVI on Mac OS X or Windows kicks off. Just let the program work its magic.
You can get important status information of how long the process will take by checking process bar on the item.
After the software is done converting the MOV video on Mac or PC, you're ready to going to find the new AVI video in the target folder you set.
Have a good time!
About David James
 Video ConverterConvert files from one format to another
 iPhone Data RecoveryRecover deleted files from iPhone, iPad
 Blu-ray CreatorBurn video & audio files to Blu-ray
 Blu-ray PlayerPlay Blu-ray, DVD, and movie files easily
 Blu-ray RipperRip Blu-rays/ DVDs to digital files
 Blu-ray CopyCopy Blu-rays/ DVDs to another disc