How to Convert MOV to WMV on Mac & PC

David James
Updated on Aug 29, 2023
MOV is a QuickTime-wrapped file format used to work with multimedia files on Mac operating system while Windows has its proprietary file formats called WMV and ASF. While .mov is a popular video format amongst Apple products like iPhone, Apple TV, iMovie, those running a Windows PC machine, tablet, or smartphone may prefer to use Windows Media Videos (.wmv) as their first choice.
So, there are a whole slew of reasons why you want to tackle with the QuickTime .mov files, and convert into Windows Media File (.wmv), particularly in Windows environment: On occasion you receive an email attached a video clip and the video file extension is MOV, you supposed to use Windows Movie Maker to edit it but find that you cannot import them at the moment; you try to watch something a Mac-using friend sent to you in a MOV format on a Windows phones but get a error message with playback compatibility issue; you captured a few .mov footage with digital camera on the trip and want to organize them in Media Center on your PC.
Luckily, regardless of what operating systems you're using - Windows or Mac OS X, converting QuickTime MOV to WMV can be finished easily and quickly with the help of something like Video Converter.
It offers a good balance between ease of use and power of conversion. While a huge number of inputs are accepted including MP4, MOV, VOB, AVCHD (MTS, M2TS), AVI, MKV, the software will output the file and save to almost any type of format you know for both portable and console players such as iPad, PS4, Xbox One, Android phones, tablets. There are other features bundled in the software, such as extracting tracks from video or ripping between audios, and editing the video, joining multiple files into one.
Here below is exactly how to convert MOV to WMV file for Mac. This tutorial uses the Mac version of the application, but you can still follow it to complete the process of converting MOV on Windows. See more about Blu-ray burning task if you want to convert QuickTime files and burn onto Blu-ray here.
To get started, you need to click the link above to download the software on your Mac (or PC).
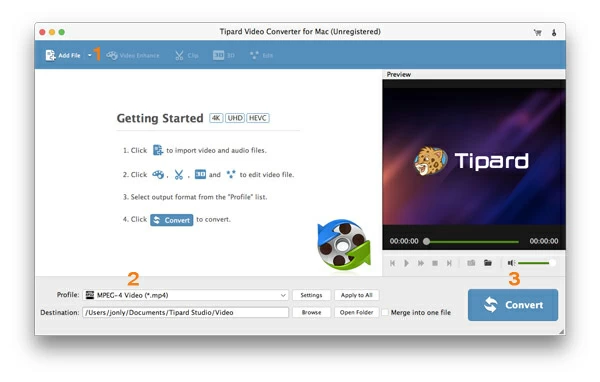
As soon as you open the program, a clean and easy-to-follow interface appears in front of you, with large, easy-to-recognize buttons for the main functions of loading files, choosing output settings and converting them.
Now, it's time to add your MOV files.
Stage 1 – Simply enter file(s) you want to convert
To add MOV videos you want to convert into WMV on Mac, click on the "Add File" button from the top menu left side. Browse until you find the MOV files (H.264 video, AAC stereo audio / AC3 DD5.1 surround audio; AIC video, PCM audio; MPEG-4 video, MP3 audio; etc.,) highlight them and click the Open button to import into the program window. Or directly use drag-n-drop feature.
The program can handle batch conversion of several video files, so in your video folder, you can press and hold the Ctrl key to select multiple items.
As a universal program, the converter also lets you import any other source file on hard drive to transfer to WMV, such as MP4 to WMV on Mac, MKV to WMV, AVI to WMV and more.
Now you need to decide what type of format you want to export.
Stage 2 – Choose the output format
For the purpose of this article, we need to make the MOV movie films into a WMV format.
So, click on the "Profile" drop-down menu, it will bring up a new panel—you will see a wide range of file types. For simplicity, choose "General Video" > "*.wmv".
Note: for those who want to convert HD MOV file to HD WMV file, you can choose to pick up "HD Video" > "HD WMV Video" though.
Stage 2.1 – Deeper control over output Settings (optional)
This MOV to WMV converter for Mac has options to deeper control over the quality of output results.
Click on the "Settings" next to "Profile", it will bring you to a Profile Settings window where there are codec, bitrate, aspect ratio, resolution, frame rate you can change in Video and Audio section like this:
It's optional, as the default value of all settings is optimized already. You can leave them as they are.
Stage 2.2 – Preset-choosing
The software understands you enough. Except for choosing a specific .wmv file type as output, the software allows you to go with the presets categories and produce movies for a handheld device you happen to own, including Surface (Pro) 2, Xbox One (360), Android phones, iOS phones, etc ...
When you click on that preset, all necessary profile settings are automatically configured behind.
See how to copy AVCHD to iTunes for sync with iPhone or iPad.
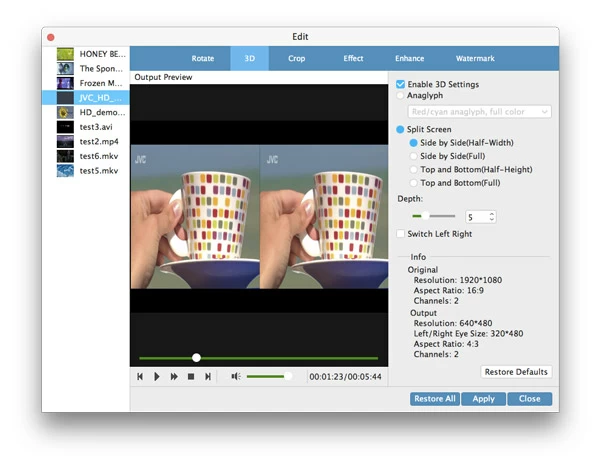
Stage 3 – Video editing (optional)
Output settings can all be changed, along with a slew of options for editing video prior to conversion.
By clicking the "Edit" icon on the top bar in main screen, a editing window shows in front of you, allowing you to adjust the video effect, add watermarks, split video into small parts, and remove black bars.
Stage 4 – Start the conversion
Now, launch the process by pressing blue "Convert" button on the bottom right side, the Mac QuickTime mov to WMV converting process begin.
You can track through a progress bar beneath the video item, which reveals an increased percentage of the converting from MOV to WMV for Mac.
Grab a coffee or a snack until the new file(s) is ready on folder.
That's really all there is to it, it's very easy.
About David James
 Video ConverterConvert files from one format to another
 iPhone Data RecoveryRecover deleted files from iPhone, iPad
 Blu-ray CreatorBurn video & audio files to Blu-ray
 Blu-ray PlayerPlay Blu-ray, DVD, and movie files easily
 Blu-ray RipperRip Blu-rays/ DVDs to digital files
 Blu-ray CopyCopy Blu-rays/ DVDs to another disc