How to Convert MTS Video to QuickTime

David James
Updated on Aug 29, 2023
Let's you're on a long vocation with family, and you use your AVCHD camcorder to capture important events and funny moments. When it comes to loading the footage to your computer, it should be in a .mts file extension. If you just play those high-definition 720p or 1080p mts on Windows machine, you most probably don't have any problem with them.
The MTS movie files created by camcorder however cannot natively be played by QuickTime player that's included in a Mac computer. If you happen to have a Mac and intend to view those .mts format files (HD video, 720p/1080p) onto QuickTime, one of the ways you can do is convert the files to a QT friendly file firstly, but I'm sure that there are other solution that can do as well.
When you talk about best MTS to QuickTime converter on a Mac, you can get a better option than Video Converter for Mac. This utility handles almost any imaginable format and convert to a large variety of video formats while at the same offering a host of advanced conversion options. The converter also comes with presets for converting videos to the proper sizes for a wide range of popular iOS devices, Android tablets, smartphones as well as game consoles.
Its Windows counterpart — Video Converter for Windows is available for those who're running a PC with Windows system to convert MTS 1080p, 720p video to QuickTime file.
Getting Started:
Workflow: how to convert MTS to QuickTime on Mac OS X
Stage 1 – Launch this MTS to QuickTime converter and add MTS files into it
Open up the application.
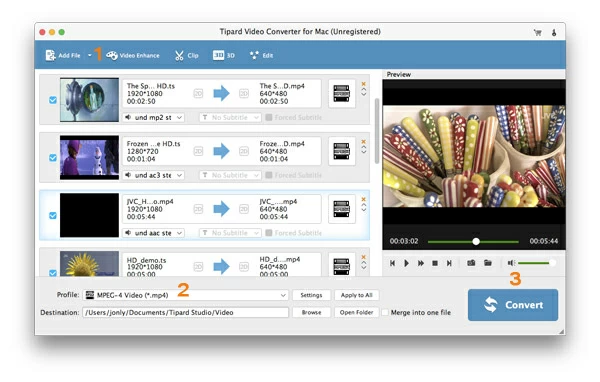
You either drag the MTS video files which you intend to add for conversion and drop them into the drop-zone on the portion of the program. Or go to the top menu and click "Add File", this will bring up a browse box from which you can navigate to the folder that contains your full quality MTS files, then select the file(s) and click on Open.

Stage 2 – Choose a QuickTime format as output file
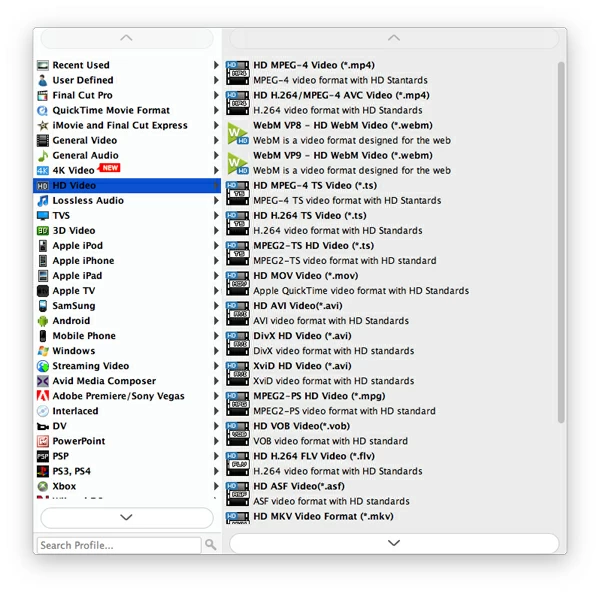
In "Profile" drop-down box (located at the lower left side) there are a lot of formats available for users to choose from: General Video, HD Video, HD Audio, 3D Video, 4K Video, Streaming Video, Windows, and more.
For this demonstration, we're going to simply choose the "HD H.264/MPEG-4 AVC Video (*.mp4)" or "HD MOV Video (*.mov)" that QuickTime accepts well. Once have selected the format, the MTS to QuickTime converter for Mac OS X will make the necessary changes automatically to the output settings.
BTW, there are a slew of pre-configured profiles on the list: Apple iPad, iPhone, Android phones, PS4, Xbox One, TVs, PowerPoint to name a few. In most cases, if you're converting a movie solely for playback on a device that happens to be included in the list, you can just focus on that device preset and pick it. The application will deliver the most suitable value of video settings to you.

Set compression values if required
If you're a videophile and know what you're doing, go ahead and click the "Settings" button next to "Profile" to fine-tune the different compression settings such as bitrate, codec, resolution, sample rate, etc.
This is a personal preference, so play with the numbers until you figure out what works best for you.

Video editing filters
This MTS to QuickTime converter for Mac also comes with a group of video editing filters, which allows you crop, trim, rotate your video, add 3D effects, remove video noise and more. All this can be performed in "Edit" at the top menu of the screen.
Stage 3 – Start conversion process
Before the actual conversion, go to the "Destination" field, click the "Browse" button and specify a location on your computer to save the resulting files.
Now, simply press the button marked "Convert" at the bottom right corner of the program window, the application will start converting your video files in .mts to a QuickTime format on Mac OS X.
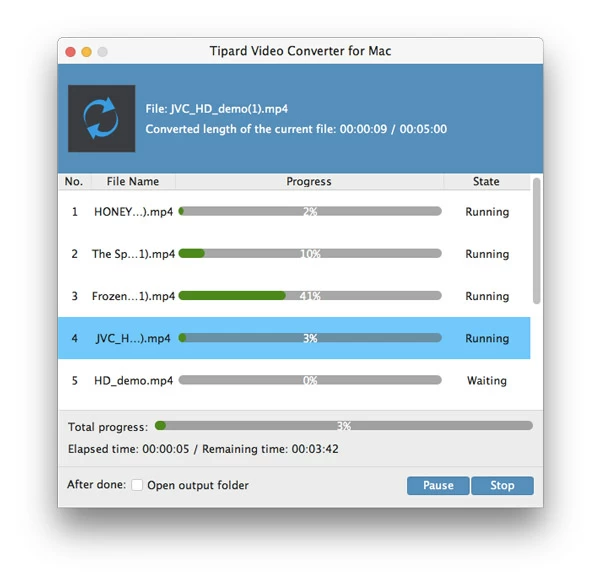
A new window will comes up that you can keep track of its conversion process through the progress bars. If you want to stop or pause the process at any time, you can click the corresponding buttons to the bottom right of the window.
Once the conversion is done, retrieve the converted files from the output file path you previously specified, you're ready to play those video files without interruption on Mac.

Happy MTS to QuickTime converting!


About David James
 Video ConverterConvert files from one format to another
 iPhone Data RecoveryRecover deleted files from iPhone, iPad
 Blu-ray CreatorBurn video & audio files to Blu-ray
 Blu-ray PlayerPlay Blu-ray, DVD, and movie files easily
 Blu-ray RipperRip Blu-rays/ DVDs to digital files
 Blu-ray CopyCopy Blu-rays/ DVDs to another disc


