How to Convert QuickTime File into MP4

David James
Updated on Aug 29, 2023
If you're a Mac user, it is not surprising that you come across QuickTime video file on many occasions. When you shot a video with your iPhone, the file extension may be in QuickTime *.mov; when you choose to export a project from Mac applications like Final Cut Pro, iMovie, there is "QuickTime Video..." option you can choose to create a QuickTime movie file. Also, you can grab QuickTime video clips from online sites.
However, QuickTime file is not always popular in this digital era. Many of media players and devices can't accept the QuickTime formats. Luckily, this problem is easy to solve — all you have to do is convert the QuickTime videos to MP4 format, the most widely used file type across multiple platforms, with a video converter application.
QuickTime to MP4 conversion software
The web is full of MP4 video converters that claim to help you transfer QuickTime video to MP4 format on Mac or PC's, one good example of this type of software is Video Converter for Mac. It will accept virtually any video file including QuickTime video (.mov) you can dream of as an input, and convert to a MP4, WMV, MKV, FLV, AVI, MPG and others. Plus, the software provides a easy way to you for choosing device-targeted presets if you just want to playback the video on a device or player, without messing with all of conversion settings (format, codec, bitrate, frame rate, etc.).
Another nice thing about this tool is it's cross-platform support — you can use its Video Converter for Windows to convert QuickTime to MP4 (mpeg-4, h.264) video file on Windows starting XP.
Click the link above to download the copy of the software. It should be a fairly quick install and you don't have to choose any options. After the installed is complete, go ahead and open up the software.
QuickTime to MP4 converting workflow
Stage 1 – Add QuickTime source files on your computer to this MP4 converter
To load QuickTime movie file(s) onto this utility, simply drag and drop the files to be converted into MP4 onto the main interface. You can also use the "Add File" button located at the upper left corner of the screen.
Stage 2 – Select MP4 format from "Profile" as output
Next, choose your preferred format for conversion from the "profile" drop down list.
In our case, we need to convert the QuickTime file to MP4 video format.
So scroll down the list until you find "HD Video" column, then choose "HD MPEG-4 Video" or "HD H.264/MPEG-4 AVC Video".
Advanced settings
Experienced users are allowed to fine-tune a bunch of conversion settings of the videos including video & audio codec, bitrate, frame rate, resolution, channels, sample rate and more. To do this, you just click on the "Settings" button next to "Profile" to access the Profile Settings window.
Beginners should stick with the default value of the options if this is your first time.
After you've tweaked (or left untouched) the advanced settings on this window, click OK to close the window and we'll get to the next step.
Choose a preset
This QuickTime to MP4 converter for Mac comes with a large number of pre-defined profiles. These range from Apple iOS players, Android smartphones to PS4, Xbox One, to online video-sharing sites, making it fast and easy to convert your videos for use on that device of your choice.
Once you select the preset profile, it will then automatically optimize all the conversion settings for the video that you need.
Edit the video (optional)
If you're not satisfy with the look of the video, you can perform some basic editing on it.
To trim parts out of the video, for example, clicking on the "Clip" button at the top menu bar of main screen will lead you to another window where you can set the beginning and end of the portion to remove unwanted extras.
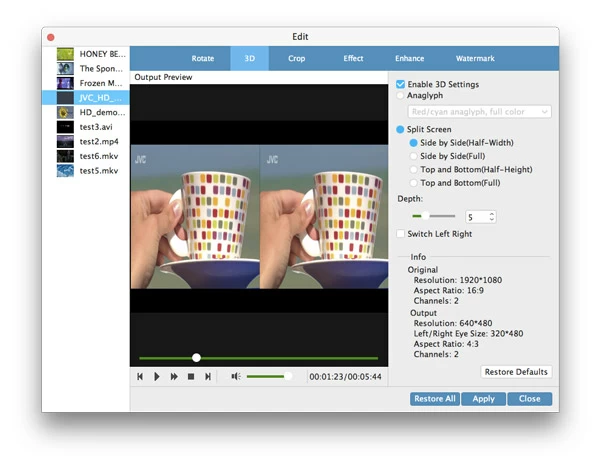
By clicking on the "Edit" button at the top menu, you can also use other filters including ability to rotate, crop, enhance the video, add 3D effect, put watermark, etc.
Stage 3 – Start converting!
Finally, check the "Destination" under "Profile" drop-down menu at the lower left side of the screen for your converted file. You can change the directory to save the video somewhere you like on your computer if you don't want to use the default path.
Once you've go everything set up, converting QuickTime videos to MP4 on Mac is relatively easy. Simply hit the blue "Convert" button located at the lower right corner of the screen, the conversion will begin.
Depending on how large the QuickTime files are, the process will take anywhere from minutes to hours. Just grab a cup of coffee and have a rest.
After your QuickTime movies has been converted to MP4 format on Mac, you can move on to get them into the right place so you can access them easily and quickly.
About David James
 Video ConverterConvert files from one format to another
 iPhone Data RecoveryRecover deleted files from iPhone, iPad
 Blu-ray CreatorBurn video & audio files to Blu-ray
 Blu-ray PlayerPlay Blu-ray, DVD, and movie files easily
 Blu-ray RipperRip Blu-rays/ DVDs to digital files
 Blu-ray CopyCopy Blu-rays/ DVDs to another disc