WMV Converter: Convert Files to and from WMV

David James
Updated on Aug 29, 2023
WMV (Windows Media Video) is a multimedia container format most commonly used to store video and audio streams. It is developed by Microsoft and is part of the Windows Media framework. The WMV format has enjoy a large amount of popularity over the past decade on Windows platform.
If you are using the WMV video file in Windows media players and applications, it's no problem. However if you want to copy those WMV files into Mac and try to play on QuickTime or import into iMovie, for example, it's difficult without using 3rd-party plugin or converting to a Mac-natively format with WMV converter for Mac. Today, we are going to talk about WMV conversion for use elsewhere—converting WMV videos to playback on your Apple iPhone or iPad or compressing the size and saving on Mac HDD or incorporating them into a new project in iMovie or FCPX.
Find More: How to Play WMV on Mac OS X Smoothly.
WMV video converter—Mac, Windows
There are dozens of WMV converters on the market, some good, many bad. Video Converter definitely stands firmly on the side of excellent applications and it worth using. It's a efficient and easy-to-use program to convert WMV videos into a list of different video & audio formats on Mac and Windows that's compatible with QuickTime player, iPhone, iPad, Android smartphones, Kindle Fire, YouTube, PSP, Xbox, etc. You can also convert other formats with it with hassle-free. Main features are as follow.
1. Easy-to-use interface. The WMV converter for Mac/ PC's interface is easy to navigate, thanks to an clearly layout and well-labeled buttons that describes the main features.
2. Output organization. You can use this WMV video converter on Mac & PC to convert WMV or other movies into just about any imaginable format like AVI, MP4, MOV, FLV, M4V, MKV, 3GP, VOB, MPEG, ASF, etc. And format profiles are clearly sorted by "General Video", "HD Video", "4K Video", "3D Video", and every profile includes short descriptions, so you'll know exactly what you're choosing to convert to.
3. Flexible output settings. For those who know more about videos and computers, accessing the advanced settings (bitrate, frame rate, resolution, codec, channels) for further tweaking output video quality and size is easy. But a novice user can go without changing anything.
4. Device Optimization Profiles. This PC & Mac WMV converter has the added bonus of allowing you to choose from device-targeted presets as output if you want to convert your movies for use on a device you own. They're organized by name and manufacturer, and this list includes everything from Android smartphones, tablets, Apple iPhone, iPad, TVs, Xbox, PSP, Samsung, Windows devices, and more.
5. Audio Extraction. The WMV video converter for Mac/ Windows also makes it easy to strip audio track from WMV or other digital videos in just a matter of clicks and save in .mp3, .wma, .m4a, .aac, .ac3, .flac, .wav, .mka.
6. Handy editing tools. The application includes a nearly complete array of customization tools that allow you to trim, crop and rotate the video, merge multiple clips into a single one, and adjust the picture values of a video before you start conversion.
7. Speedy conversions. Conversion speed will vary depending on factors like how many files are in process queue, how large they are and output settings you configured, of course. But the WMV video converter for Mac/ Windows take full advantage of available system resources. The WMV converter for Windows even gives you the ability to activate AMD or CUDA acceleration option in preference.
The instructions below will show you how to successfully complete this process of converting from WMV format to any other type of formats you need. It applies for conversion from other videos to WMV file as well. The following screenshot based on trial version of this WMV converter for Mac OS X.
How to convert WMV files on Mac using WMV converter (for example)
Stage 1 – Add WMV video files to the software for conversion
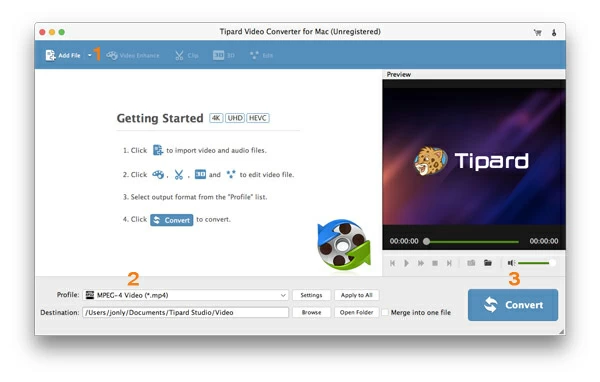
When you first open the program, you are directed to a welcoming, simple and clean interface in which you can see all necessary functions displayed well on the top menu and bottom corner.
To begin, just drag any and all WMV videos you want to convert from your computer and drop onto the blank area or click "Add File" on the top menu to browse for your selection.
Note, click the arrow next to "Add File" there is a hidden "Add Folder" option which allows you to select a full folder where WMVs are located for conversion.
Stage 2 – Choose the output format from an extensive list of options in "Profile" menu
Now on the bottom left side, you click the "Profile" pull-down menu which allows for different format profiles to be chosen. For most cases, I prefer to use MP4 profile under "General Video" or "HD Video" category since the file type turns out pretty smooth for playback and has a great compatibility across platforms.
Also, you can select from whichever format profile from the list, no matter you need to convert WMV files to, or convert your movie collections to WMV video format.
Afterward, you can check the "Destination" box on the bottom to specify a new location where you want your resulting files to go.
Related: How to Import WMV to Edit in iMovie.
To make the output file more flexible, this Mac WMV converter gives advanced users power to play with different conversion settings behind the main interface to decide how the output file will look.
You can access this by clicking the "Settings" button near "Profile" pull-down menu. In settings window, you can see there are various parameters available for you to fine-tune on video and audio respectively.
It is advisable to experiment with a short video with different settings to see how the changes affect the resulting file, then you decide which group of settings you want to use on the window.
Choose from presets instead
While the program can be used to convert anything from its native format to any other formats for all sort of different purposes, it is particularly well suited with handy device-oriented preset, allowing you to convert digital movie ready for playback on device of your choice.
Perhaps more important, the preset has optimized everything for conversion—you don't need to waste time to tweak the output settings but only find that they are not suitable for the device.
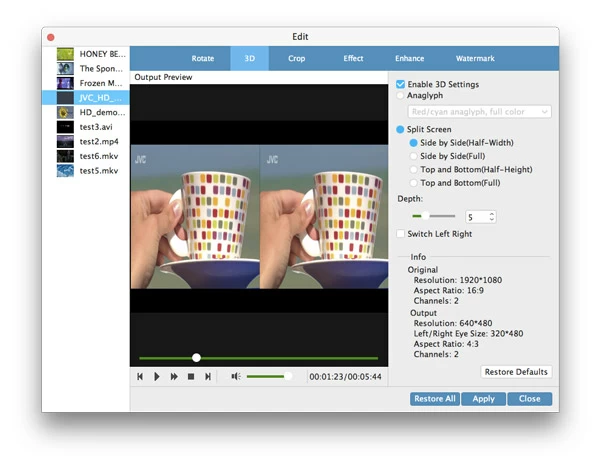
Basic editing capabilities
The Mac WMV video converter also includes advanced video-editing features, such as the ability to delete unwanted part of the video by setting exactly the start point and end point, remove black bars on the sides, rotating the video, get ride of video noise, adjust brightness and saturation, and others.
To do this, head over to "Edit" or "Clip" icon on the top menu of the program's screen, which will get you into the video editing window, as shown below.
Stage 3 – Begin conversion
When you've got everything just how you like it, click the big "Convert" button at the bottom right-hand corner of the interface to start converting WMV on Mac into any other file format, or vice versa.
The time needed depends on your computer system resources, file size of original files and other factors. Be patient, or let the conversion process run overnight if there are a large number of video files in the process queue - you can set Shut Down Computer to "Action" option in "Conversion Done" tab in Preference.
During the WMV conversion process, you can monitor the process with progress bars to see whether the video file is in the process of being converted, waiting to be converted, or already converted.
That's it! Hope it is useful for you.
About David James
 Video ConverterConvert files from one format to another
 iPhone Data RecoveryRecover deleted files from iPhone, iPad
 Blu-ray CreatorBurn video & audio files to Blu-ray
 Blu-ray PlayerPlay Blu-ray, DVD, and movie files easily
 Blu-ray RipperRip Blu-rays/ DVDs to digital files
 Blu-ray CopyCopy Blu-rays/ DVDs to another disc