How to Add WMV Movie Files onto iTunes

David James
Updated on Aug 29, 2023
WMV is a widely-used video format used for streaming video, slideshow presentations and screencasting in Windows environment; you can grab WMV files from online video-sharing websites. But what if you have a collection of WMV movie files you love, and want to import to iTunes library that you can then play WMV on iPad or iPhone?
Although iTunes is a great way to organize and enjoy your love of music, movies, and TV shows, it only natively supports H.264 and MPEG-4 video in *.mp4, *.m4v and QuickTime *.mov file formats, so many of the digital videos including WMV files you come across can't be added directly to iTunes library. That is where video converting utilities come in.
The web is full of WMV video converters that claim to convert WMV to iTunes friendly format on both Mac and PC machines, though, and Video Converter is a good example. It comes with a user-friendly GUI and allows users to quickly navigate to the features they want. It converts WMV to add videos to iTunes library, and convert your movie collections on your computer to various of formats easily and quickly. Besides, there are a bunch of advanced features under "Settings" button for complete customization of video and audio compression, quality, etc.
Click the download links above you will be prompted to save a file. Once it has downloaded, run it, and the software will install. When the installation has finished, launch it.
How to convert WMV and copy to iTunes library for Mac and Windows
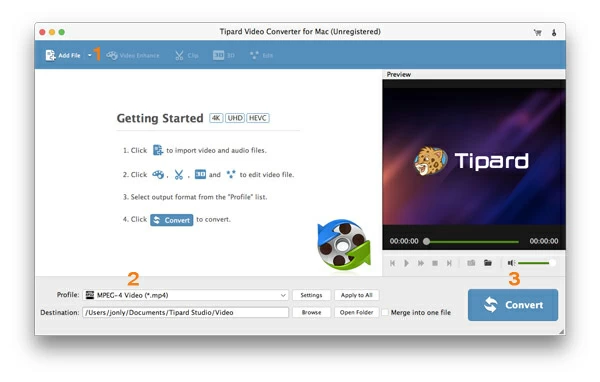
Stage 1 – Add your WMV video files into this WMV converter
The program comes with a clean and responsive interface that makes converting WMV and other files to iTunes intuitive and fun.
Adding WMV files that you want to import into iTunes is as simple as drag-and-drop with your mouse.
Alternatively, click the "Add File" button at the top left side of the main interface, this will open up a file-choosing window, from where choose either a single WMV video file or a full folder of WMV files.
Stage 2 – Choose a output format (MP4, M4V, or MOV, say) or a particular iOS player
After you import .wmv movie files, you will have to configure you output settings.
At the lower left side of the screen, click the "Profile" drop-down menu, you will then see a list containing several output formats and a wide range of available pre-set devices (Apple iPhone/ iPad series, Android smartphones), game consoles, popular software, video streaming sites.
In this example, we just head to "HD Video" category at the left pane, then scroll down the list, and select HD H.264/MPEG-4 AVC Video (*.mp4), or HD MOV Video (*.mov) option.
If you don't want to do anything extra, you can now go straightly to Step 3 and just click the "Convert" button and the software will convert your WMV files to an iTunes compatible file in Mac/ PC.
Experienced users can click the "Settings" button next to "Profile" drop-down menu to display the output controls. From where you can tweak any of the optional video & audio conversion settings such as codec, resolution, bitrate, frame rate.
A typical mistake for this task is to set the quality too high, making the end result in a big size. You need to find the right balance between quality and size. Also, we'd advise leaving settings alone, unless you know what you're doing.
If you want to play the WMV on a device
If you're importing WMV to iTunes library it's probably because you want to sync the movie to your iOS player such as iPhone or iPad so that you can streaming the movie on the go anytime.
Should this be the case, rather than selecting a specific video format that your iTunes will accept from "HD Video" category and trying your hard to configure the conversion settings, you can go to "Apple iPhone", "Apple iPad" or "Apple iPod" category instead, and choose your device model (i.e. iPhone 6s, iPad Air). The values including resolution, codec, bitrate, frame rate, channel, etc. for the output video will be optimized automatically for you when you choose that device preset.
Edit the video (optional)
Aside from WMV converting to iTunes, the software has useful video editing capabilities: crop video to remove black bars; trim audio or video to cut out unwanted sections; adjust brightness, contrast, and saturation; and add watermark; you can also take snapshots of video.
Note that this is not a necessary step, but it will make it more friendly to convert your videos for best viewing on device.
Stage 3 – Start converting WMV to iTunes files on Mac/ PC
Finally, make sure that the default destination beneath "Profile" drop-down menu has enough free space to save the newly converted video file. You can also click the button labeled "Browse" to change the directory to somewhere else of your choice on your Mac or PC machine.
When everything is OK, click the "Convert" button at the lower right side of the screen, the software will begin converting your WMV video files into a format you set in Stage 2 that iTunes recognizes.
If you don't want the software to eat up your precious CPU capacity while you're working on your computer, you can leave the program to do its business overnight and go to Preference > Conversion > Conversion Done > Action and select "Shutdown", so that it will shutdown your computer automatically when the WMV to iTunes conversion is finished. When you get up the next morning, you'll be seeing the newly converted video files.
Stage 4 – Import the converted files from your computer into iTunes library
Once this WMV converter is done converting the WMV videos, you'll get the MP4, M4V or MOV files that you can import them into iTunes so they appear in your iTunes library.
To do this, you can either simply drag the file(s) from the target folder to the iTunes window, or choose File > Add to Library in iTunes, locate your videos files, and click Open.
About David James
 Video ConverterConvert files from one format to another
 iPhone Data RecoveryRecover deleted files from iPhone, iPad
 Blu-ray CreatorBurn video & audio files to Blu-ray
 Blu-ray PlayerPlay Blu-ray, DVD, and movie files easily
 Blu-ray RipperRip Blu-rays/ DVDs to digital files
 Blu-ray CopyCopy Blu-rays/ DVDs to another disc