How to Extract Audio from WMV to MP3

David James
Updated on Aug 29, 2023
WMV, short for Windows Media Video, is a compressed file format originally designed for streaming of video on the Internet. The video contained in the WMV file is often encoded with Microsoft's proprietary codecs - Windows Media Video 9. You may also find a few WMV videos using Windows Media Video 7 and 8 codecs. WMV format presents a nice advantage over some other formats - it can compress large video files into a smaller size without sacrificing picture quality.
It happens to all of us. You just downloaded a few video clips with .wmv extension from the internet, and want to extract the soundtracks from these .WMV video to save in .mp3 file to save storage space, so that you then can put them in your songs list and play in the car. The problem in front of you is how you can get a converter that's capable of converting WMV into MP3 audio fomat, while retaining the original sound quality.
Thankfully, Video Converter is just the tool for sort of such things. It's a neat and simple app that promised to extract audio files from .wmv into .mp3 in Mac or Windows with uncompromised quality. You can also use it to convert all of your video & audio files to any other format you want. There are some very nice features in this video converter, such as being able to select pre-defined device preset profiles, fine-tune the export settings (codec, bit rate, resolution, aspect ratio, channel) to get control over your result files, edit the video and more. Try it!
The example of ripping WMV and converting into MP3 audio file I've done here works for Mac OS X but you could apply the same operations for Windows system.
How to convert WMV video files to MP3 Audio for Mac
Stage 1 – Install the app and open it
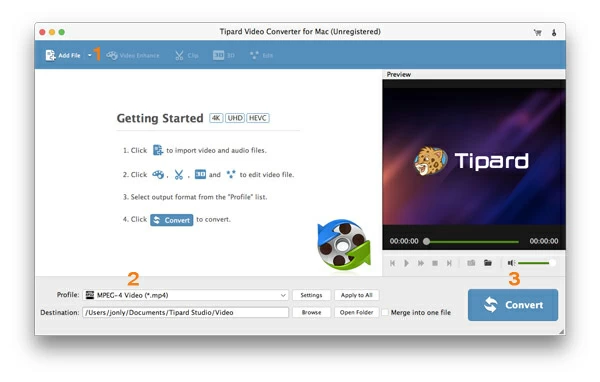
When you open the app, you can see a very clean looking interface like this:
Stage 2 – Put the WMV file into interface
The top menu of main screen provides quick access to all import tasks.
Click the "Add File" button on the left side of top menu, then navigate to your WMV located on your computer and select them to add into program window.
You can select multiple files at once, this Mac WMV to MP3 converter will convert them in a batch.
Stage 3 – Choose an output file format
Next, select the MP3 profile from the Format list.
Click the "Profile" on the right corner of top menu, a drop-down panel appears.
From there, pick "MP3 Audio" profile from "Common Audio" category in "Device" tab.
Stage 3.1 – Adjust output settings if need
The software allows you to manually tweak the conversion settings for the video if you know what you're doing such as bit rate, codec, sample rate, resolution, etc.
You can enter the adjusting window by clicking the "Settings" to the right-hand side of "Profile"
Stage 3.2 – Preset profile
Choosing preset profiles based on popular device is another useful feature of the program. You can simply select you preset profile and the program then find the most appropriate settings automatically for you, this will save you time from choosing a specific format and tweaking the annoying settings.
Stage 4 – Start the process
After you have all things set up, it's time to rip your WMV videos into MP3 format on Mac.
On the top menu there is a big blue "Convert" button at the bottom right side, click it to begin the task.
Sit back and have a cup of coffee, you're done.
Depending on how many of WMV videos needed to be ripped and the file size of WMVs, the audio creation of .mp3 from .wmv process in Mac will take anywhere from a few minutes to hours.
Read next: how to extract audio from YouTube to save in .mp3 on Mac.
When the rip completes, the new MP3 audio files should be located on your local folder. You can then view the songs on your music player or copy to where it needs to go.
Have a good time!
About David James
 Video ConverterConvert files from one format to another
 iPhone Data RecoveryRecover deleted files from iPhone, iPad
 Blu-ray CreatorBurn video & audio files to Blu-ray
 Blu-ray PlayerPlay Blu-ray, DVD, and movie files easily
 Blu-ray RipperRip Blu-rays/ DVDs to digital files
 Blu-ray CopyCopy Blu-rays/ DVDs to another disc