How to Convert WMV to QuickTime Video

David James
Updated on Aug 29, 2023
QuickTime is Apple's multimedia technology that lets you handle content including Internet video, HD movies trailers, animation, personal music, etc., on Mac OS X and Windows machines. Many Apple applications (FCPX, iMovie, Photos) use the architecture of QuickTime to view, create, and export media. However, QuickTime has limited file formats support. While you can play MOV, MP4 and M4V movie files smoothly on Mac with QuickTime, you don't expect to open a WMV file on QuickTime player.
As we know, Windows Media Video (.wmv) is natively supported in Windows environment, and almost all of mainstream media players like WMP, VLC, GOM Player, PotPlayer, Winamp, but WMV doesn't go down well in Mac. Thankfully, video converting applications makes WMV to QuickTime video conversion possible, no matter what the size and resolution (4K, 1080p, 720p, 480p) your original WMV file is.
One powerful tool that can achieve this task is Video Converter. Aside from converting WMV to a QuickTime movie format, it converts a large number of different video and audio formats in a fast way. The built-in preset feature gives you the ability to convert your videos to the right formats for device of your choice including smartphones, TVs, tablets, video-sharing sites, game consoles, popular apps and more. The software interface is pretty straightforward.
The basic process of converting WMV to QuickTime is the same on Mac and Windows — add .wmv source file(s), choose a QuickTime format, select a destination, and start the process.
How to convert a WMV file to QuickTime video on Mac OS X + Windows
See More: How to Play 1080p MKV on Mac Computer.
Stage 1 – Open the tool and add WMV videos to it
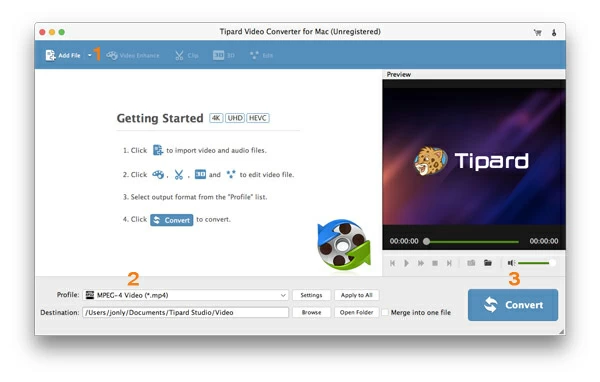
When you open the utility, you will see an easy-to-understand and concise interface. The instructions for using the tool are written in large bold letters, "Getting Started" at the center area of the screen.
To add WMV into the program, click "Add File" in the upper left corner of the window then select the drive which contains your WMV movie(s) on your computer and click OK. After the loading is complete, the movie appears under the list as seen in the image below.
Note that the tool supports batch processing for the quick conversion of multiple files, so here you're allowed to add as many WMV files as you can.
Stage 2 – Select any of QuickTime formats as output
Once you're done importing the WMV file, choose which format you intent to export to.
Head to drop-down menu named "Profile" at the lower left side of the screen, in the opened panel, scroll down the list and find "HD Video" category, then select any of format profiles that QuickTime supports, such as HD MOV Video (*.mov), HD H.264/MPEG-4 AVC Video (*.mp4), HD MPEG-4 Video (*.mp4).
While by default this step (just select the output format) is kept very simple, if you need to take more control over the conversion settings such as video/audio codec, bitrates, resolution, frame rates and more, you can click the "Settings" button next to "Profile".
It's worth pointing out that on the panel, all of these settings are already optimized. you can choose to leave all settings alone.
Choose your preferred device option
If the purpose of converting video in .wmv to QuickTime file on Mac is to be able to play the movie on a Apple iOS player like iPhone, iPad, you can simply select the preset profile from the Apple related categories in the list instead. The same goes for Android phones, game consoles and other popular applications. This will keep you from getting bogged down in conversion settings configuration.
Video editing
A further option is to edit the video. This Mac WMV converter include the ability to trim, crop, rotate your source footage, adjusting video effects and adding watermark are also supported.
Stage 3 – Verify the file saving path
Click the "Browse" next to "Destination" in the lower left side of the screen, specify a path where you want to save the resulting QuickTime video file.
Stage 4 – Click "Convert" button to begin the process
When everything is set up, hit the blue "Convert" icon button on the lower right corner of the interface, the software will start converting WMV video file into QuickTime format on your Mac or PC machine.
The converter comes up a new window with progress bars to let you see how things are progressing. You can stop it or pause it at anytime and check the "Open output folder" option to remind you that the conversion is complete.
That's it!
About David James
 Video ConverterConvert files from one format to another
 iPhone Data RecoveryRecover deleted files from iPhone, iPad
 Blu-ray CreatorBurn video & audio files to Blu-ray
 Blu-ray PlayerPlay Blu-ray, DVD, and movie files easily
 Blu-ray RipperRip Blu-rays/ DVDs to digital files
 Blu-ray CopyCopy Blu-rays/ DVDs to another disc