How to Download YouTube Video and Add to iTunes Library

David James
Updated on Aug 29, 2023
Two parts included: 1) Convert downloaded YouTube to iTunes, 2) Download YouTube and import to iTunes.
YouTube is one of the most widely known and used video-sharing websites that lets you upload your videos to share them with your friends and family worldwide. From there, you can find a huge array of fascinating user-generated content, including clips from movies and music, sports and news, live content and amateur videos.
YouTube takes H.264/MPEG-4 AVC, Adobe Flash Video and WebM technology to display video in site. So if you downloaded videos from YouTube, you would get the video with .*mp4, .*flv, and .*webm file extension, and here comes the tricky part: How can you upload those downloaded YouTube videos to manage on iTunes library on your Mac or PC machine? Not all of videos grabbed off YouTube will be accepted by Apple iTunes, which only supports a limit list of video formats that works with QuickTime framework such as MOV, M4V and MP4.
For purpose of making YouTube video files workable in iTunes, one of the most efficient ways is to convert the downloaded videos from YouTube clips to iTunes friendly format and add them to the library that then you can sync to your iOS device.
There are many utilities available for converting YouTube video files to manage on iTunes library, but the one we often turn to is the Video Converter. It makes (YouTube) video to iTunes conversion an absolute breeze. It converts just anything from one format to another. Besides, the tool has built-in pre-defined profiles for various Apple devices (and popular handheld devices on the market), all of which are compatible with iTunes.
To help you quickly upload YouTube clips to iTunes, this article will guide you through the steps necessary to convert videos downloaded from YouTube to iTunes supported file and then add it to iTunes.
Part 1: How to convert YouTube video and add it to iTunes on Mac/PC
Launch the program
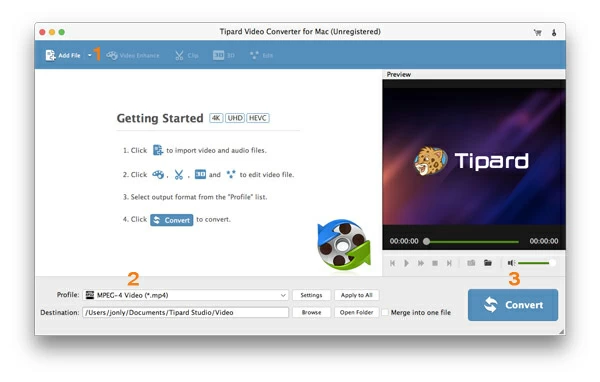
The main interface of the program would look like what you see below after you fire up it.
Stage 1 – Import YouTube video file(s)
From the top menu, click "Add File" button, this will bring up the file browser in which you use to add YouTube videos that you want to convert to iTunes to the software.
From there you can actually use drag-and-drop to finish the adding job.
Stage 2 – Configure iTunes exporting options
Both M4V and MOV are supported by iTunes as well as MP4, so you can choose any of them as output format.
To do this, click the "Profile" button to enter the format selection panel:
From the panel, select any of iTunes friendly formats (mp4, mov, m4v) that you want to convert YouTube video into. There is a lot of other format profiles available for you to convert the YouTube files to, like YouTube to AVI, MKV, RMVB, WMV, VOB, and more
Stage 2.1 – Tweak encoding settings
In addition to making the choice to convert YouTube videos and manage in iTunes on Mac and Windows computer, you may have other choices available as well. By clicking the "Settings" to the right side of "Profile", you can change the video codec, resolution, bit rate and other things.
Note that we recommend staying with the defaults if you're not familiar with them.
Stage 2.2 – Select preset instead
Apart from "General Video" and "General Audio" categories, this YouTube to iTunes converter also has preset profiles categories available, allowing you to convert videos and generate new files optimized for popular devices of your choice such as iPhone, iPad, Galaxy, Kindle Fire, etc without the necessity of knowing the specific parameters and file format.
Stage 3 – Convert and transfer YouTube file to iTunes
Now, hit the "Convert" button on the lower right side, the application will now start converting the YouTube video files to iTunes compatible format on Mac or PC machine while you sit back and browse the internet.
Again the amount of time the process takes will vary between the size of the YouTube video and settings you set.
After the conversion complete, you then can add the converted friendly videos to iTunes library.
That's it!
Read next: how to burn TV shows to Blu-ray disc on Mac OS X and Windows here.
Part 2: How to grab videos off youtube.com (and other sites) to iTunes
YouTube and many other video-hosting sites themselves do not offer a download link for videos on their web pages. If you find videos you'd like to send to iTunes, you will need to turn a third-party app or plug-in to download from YouTube or other such kind of sites.
There are many ways to download YouTube videos and other sites' video, here we'll use AllMyTube, which can download videos off sites and convert them all in one place.
Here below is the basic step you need to download videos off YouTube and convert to iTunes file that you then can add to iTunes library on your Mac or PC.
1. Go to YouTube and copy the address URL of the video, and then add the URL into the program using the corresponding "Paste URL" button on the top left side of interface to begin downloading tasks.
Alternatively, in your browser (Mac - Safari, Firefox, Chrome; Windows - Internet Explorer, Firefox), click the "Download" button on the top right corner of playing video to download.
2. Next, click the "Downloaded" category on the left portion to open the downloaded YouTube videos list. Then click the corresponding "Convert" button next to the related information of video that we want to add to iTunes library.
3. This will display a format selection panel where you can find almost every file format you like.
4. After you have output format selected, click the OK button to close the panel and begin converting the incompatible YouTube videos to iTunes file for Mac or Windows.
5. After the conversion finishes, it's time to add the converted files to iTunes. Enjoy it!
About David James
 Video ConverterConvert files from one format to another
 iPhone Data RecoveryRecover deleted files from iPhone, iPad
 Blu-ray CreatorBurn video & audio files to Blu-ray
 Blu-ray PlayerPlay Blu-ray, DVD, and movie files easily
 Blu-ray RipperRip Blu-rays/ DVDs to digital files
 Blu-ray CopyCopy Blu-rays/ DVDs to another disc