How to Convert & Download YouTube to WMV

David James
Updated on Aug 29, 2023
Two parts: 1) Convert downloaded YouTube to WMV, 2) Download YouTube and convert to WMV.
YouTube is a way to host user-generated and corporate media videos, ranging from Music, Sports, Gaming, to Movie, News, Live and other channels of videos. Millions of videos have been uploaded every day. Anyone with Internet access can view and share videos on YouTube, and can even grab favorite video clips from YouTube with third-party video downloading apps or plug-ins.
However, whether those downloaded YouTube videos are the flash FLV file, the quality MP4 file, or the WebM HTML5 file, the need to convert videos downloaded from YouTube to WMV format on your Macs or PCs is something many can identify with. For instance, the default player on Windows computer - Windows Media Player - only accepts a limited number of file types (wmv, asf, avi, mpg) as input, making it inconvenience to playback those YouTube videos. Instead of taking amount of time to download and install different of codecs to support all those YouTube videos, converting videos from YouTube to WMV file is a quick and easy way.
No matter what video formats you want to convert YouTube video files into, there is a list of different YouTube converters out there available. In this article, we will discuss Video Converter because it's pretty good for converting YouTube videos to WMV for both Mac and Windows environment, and it supports plenty of other video formats as input and output, including MTS, MOV, FLV, MP4, VOB, MPEG and more. It's easy for the beginner and has a lot of flexibility to serve a more advanced user also.
In this article, we'll explain the simple process of converting grabbed YouTube videos into WMV file formats on Mac OS X with this converter.
Part 1: How to convert video(s) from YouTube to WMV video(s) in Mac
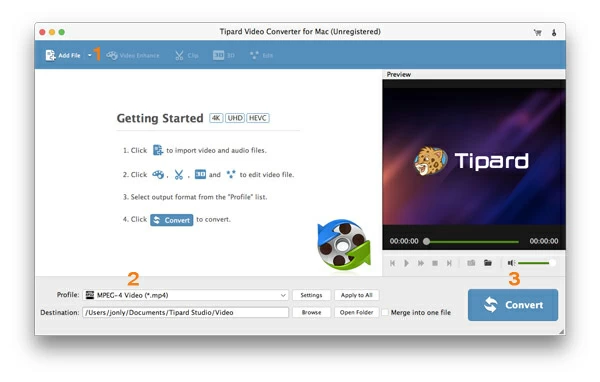
Open the program, you will see a main interface like this:
Stage 1 – Load YouTube video clip(s)
To add a YouTube video or several videos onto the program, you can simply using drag-and-drop. Or head to the top left corner and click "Add File" button to finish the source adding tasks.
The Mac converter enables you to batch process a group of videos, so here you can import a folder full of videos that you wish to convert to WMV file and convert all of them at one go.
Stage 2 – Select WMV as output
Click the "Profile" drop-down menu, then you will be presented with a window where contains a list of output format profiles and a library of available device presets.
In our case, we want to convert YouTube to WMV video files in Mac, so find the WMV Video profile and pick it as export format.
Note: some of videophiles may would like to transfer YouTube video to MP4 for Macs & PCs, the most acceptable file container amongst players and devices in the planet at current, so here you will select " MP4 Video" instead.
Stage 2.1 – Configure encoding settings
This Mac application has options for advanced users to fine-tune a few settings to produce the desired results. By clicking the "Settings" (next to "Profile", you will enter the Profile Settings window.
Just one note – The default settings are quite good, and you will get a very reasonable result.
Stage 2.2 – using presets
Aside from using a specific format, there is a wide range of target device options you can choose from. If you're converting YouTube videos solely for a portable device that you have, Microsoft Surface for example, click the Windows category and select the Surface option from the list – this will set the optimum quality and file size.
Stage 3 – Start the conversion
Once you have all steps configured, it's time to start transferring the downloaded YouTube video to WMV file on Mac computer.
Hit the "Convert" button on the bottom right corner and let the program do the rest.
The time it takes depends on how long your YouTube video is, the settings for target WMV format and your Mac's hardware.
Related: how to burn iTunes videos to Blu-ray disc in Macs and PCs.
Part 2: How to pull videos from YouTube and convert to WMV format
To download videos directly from the internet like YouTube and convert to WMV or any other media formats, there is a vast array of online & desktop apps and browser plug-ins you can choose from. In this article, we'll introduce an all-in-one desktop application named AllMyTube, which lets you download video clips from online and convert to file format you want all in one place.
The following is the basic steps to get videos off online. We take downloading videos of YouTube.com on Mac for example.
How to download YouTube videos:
1. Open YouTube.com (or other sites) and play the video that you want to download on Safari, Chrome or Firefox browser on Mac OS X. Note, Windows users please use Internet Explorer or Firefox to play the online video.
Typically you just paste the address URL of playing video into the "Paste URL" field on the top left side of the program, then click OK to begin downloading video.
Or, hit the "Download" button on the upper right corner of playing video to pull video directly from online.
How to convert downloaded YouTube videos:
On the left portion of the main interface of program, click the "Downloaded" category, you will then see a list containing all of videos you downloaded before.
Next, click the "Convert" button at the right side of list, this will bring up a new window asking you choose an output format you want to.
Then, choose an output format and the preferred options on the bottom, then click "OK". The application will now proceed to convert your YouTube videos to format (WMV, MOV, MP4, MKV, AVI...) you choose on Mac.
About David James
 Video ConverterConvert files from one format to another
 iPhone Data RecoveryRecover deleted files from iPhone, iPad
 Blu-ray CreatorBurn video & audio files to Blu-ray
 Blu-ray PlayerPlay Blu-ray, DVD, and movie files easily
 Blu-ray RipperRip Blu-rays/ DVDs to digital files
 Blu-ray CopyCopy Blu-rays/ DVDs to another disc