How to Burn MTS to Blu-ray/ DVD on Mac & PC

David James
Updated on Aug 29, 2023
MTS (or m2ts) is a high definition digital video camera recorder format used for Blu-Ray and AVCHD (and AVCHD Lite) camcorders including Panasonic, Sony's HDR-SR(xx) series models, Canon. If you're new to Blu-ray/DVD burning and were wondering what program you should use when you have AVCHD MTS files and need to burn to a Blu-ray / DVD on Mac or Windows, there will be something here for you!
Older Macs come without a pre-installed version of iDVD in boxed versions of iLife to burn your (MTS) files, but Apple has discontinued iDVD since 2007. As for PC user, Microsoft has ever distributed Windows DVD Maker as a component of Windows Vista and Windows 7 to create beautiful DVD movies with your own (MTS) videos, but the later Windows 8 (and 8.1) has not included DVD Maker. However, the worse thing is that both Mac and Windows have no application that let you convert quality MTS video files to Blu-ray disc.
How do you convert and burn AVCHD MTS files to Blu-ray & DVD and play on a BD player? Don't worry, there are many of disc-burning programs are available for you. Blu-ray Creator for Mac is our favorite to handle that job. Whether you regularly want to burn MTS to Blu-ray or DVD on Mac OS X, or just need to create an ISO image, disc folder, or even wish to make a photo slideshow, the software covers almost any of your optical needs. Apart from create BD/DVD from your any type of video files, it also lets you make customized menus and add background image and soundtrack for the disc.
If you are looking to burn your quality MTS videos to Blu-ray or DVD disc and play in your home theater system, its cross-platform version - Blu-ray Creator for Windows is the way you go.
Keep in mind that you'd better burn High-Def (.mts) video content to the Blu-ray disc, as a standard DVD is Standard-Definition (720x480) only. See more about burning downloaded videos to Blu-ray here.
Once you download and install it you will be ready to convert and burn your files, let's get started:
How to convert MTS to Blu-ray in Mac and Windows
STEP 1
Loading MTS file(s)
Insert a Blu-ray disc into your computer.
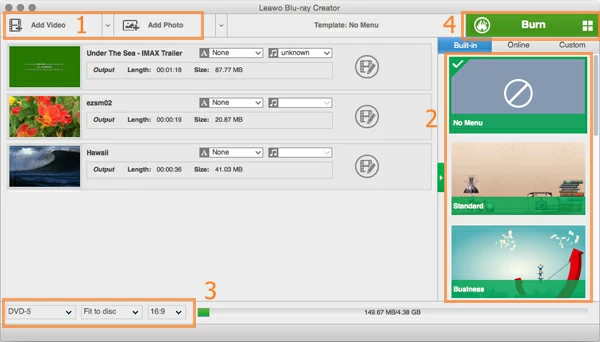
To tell the program which clips you would like to burn to disc, click on "Add Video" button in the top left-hand portion of the window to browser the MTS video(s) stored on your hard drive and import into the program.
Alternatively, drag and drop your MTS clips onto the surface of this MTS to Blu-ray converter.

After the files loaded, you can edit the video by clicking on the 'Edit' icon on the right side of the item.
STEP 2
Choosing a menu to personalize your project
You can select from a number of BD built-in menu templates on the right pane of the screen to enrich the disc.
If you would like the DVD to have no menu and just the video, just select "No Menu" from the very top of the list.

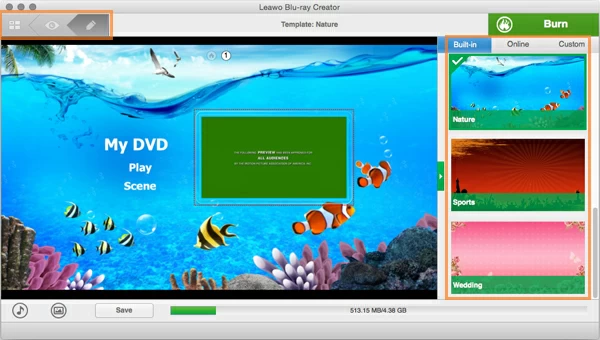
Next, you can preview what the menu looks like by clicking on the thumbnail. To edit and customize the menu, you can then click the 'PEN' icon on the top left side (see screenshot above) to activate the editing function - you can edit the menu texts, move the position of all menu items, and add your own music or image to the background.
STEP 3
Adjusting output settings
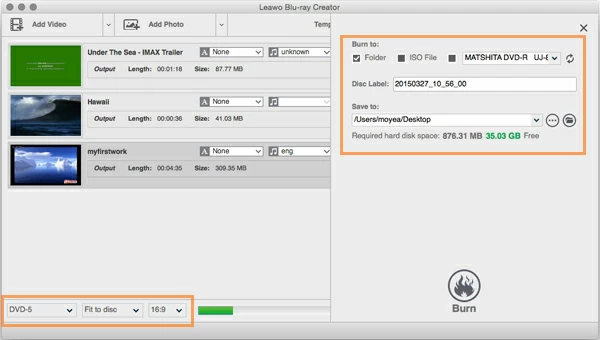
Now, click the green "Burn" button on the upper right-hand side, this will bring up a dialogue box to asking you set the output settings. Here we simply choose the Blu-ray option, and give the disc a specific name.

Also of note, if you don't have a Blu-ray on-hand for burning your MTS files, for example, you can tick the "ISO File" or "Folder" options to create ISO image or BD folder that you can easily burn to a BD later on.
STEP 4
Burning MTS to Blu-ray for Mac OS X and Windows
Once everything has been set up correctly, again, click on the "Burn" icon on the dialogue box.
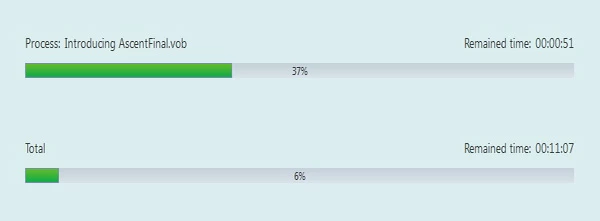
Now, the burning from MTS video files to Blu-ray disc on Mac or PC machine begins, just wait until the process is finished.
That is it! After the disc is created, you now pop it into your BD player to enjoy it on your home entertainment center with family.


About David James
 Video ConverterConvert files from one format to another
 iPhone Data RecoveryRecover deleted files from iPhone, iPad
 Blu-ray CreatorBurn video & audio files to Blu-ray
 Blu-ray PlayerPlay Blu-ray, DVD, and movie files easily
 Blu-ray RipperRip Blu-rays/ DVDs to digital files
 Blu-ray CopyCopy Blu-rays/ DVDs to another disc


