How to Convert FLV to MP4 File

David James
Updated on Aug 29, 2023
FLV and MP4 are two popular container formats that're used for distributing videos online and offline. But there are big difference between FLV and MP4. As FLV is developed by Adobe and mainly used for streaming flash video by sites like YouTube, Hulu, Facebook and other video-hosting providers, in most of time, you will have to install a flash plugin or Adobe FLV player to handle it. See also: burn downloaded videos to Blu-ray disc.
In comparison, MP4, which can hold mpeg-4 or h.264 encoded video, is the most powerful standard on this planet at current. Almost all typical desktop media players, phones, tablets, e-readers, and other devices support the playback of MP4.
Suppose if you've downloaded some favorite video clips from YouTube site, then you realize that the files' extension is .flv and no media player on your computer supports, let alone your portable device. When this happens you usually have several ways to deal with it. One of the most efficient ways is to convert the FLV to a MP4 format on Mac or Windows computer that players and devices actually do support.
There are many apps available for converting flash flv files to MP4 format, but it is extremely important that you use the right tool for doing this. Video Converter is a stable and comprehensive tool with a significant amount of features. It delivers exactly what is promised, which lets you convert a video from FLV into MP4 file for Mac and Windows as well as converts many other types of video files into all key popular formats you need. There are a host of preset profiles within it for converting footage suitable for playback on mobile devices. Experienced users can even tweak a bunch of output settings to further optimize the FLV to (h.264) MP4 or other conversions.
Be aware that the conversion process is actually the same on both Mac and Windows platform, here below I will use the Mac version of the program to convert .flv file to (mpeg-4/h.264) mp4 as example.
How to convert FLV flash video into MP4 video file in Mac
Stage 1 – Install the right version of program and open it
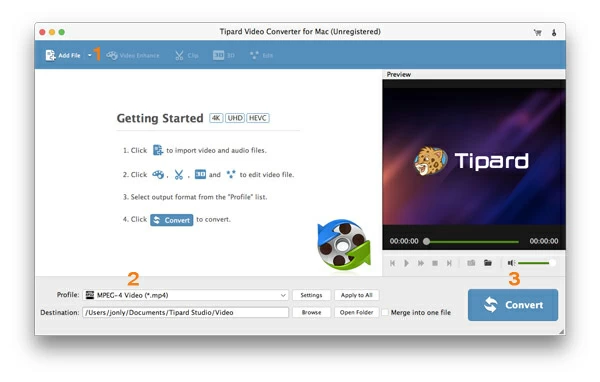
The software opens with a clear and simple interface, making it easy to find the function you need on the top menu. Here we highlight the "Add File" "Profile" and "Convert" options that you will have to use.
Stage 2 – Select FLV video files you want to convert
Head to the top menu and click "Add File" option, then locate the location of the FLV files as well as other videos (i.e. MKV, if you need to convert MKV to MP4 for Mac) in your computer. Select them and click OK to import into the program.
Or, simply drag the FLVs and drop into the drop zone of the program.
Stage 3 – Choose the profile with the desired MP4 file format
Once you have the FLV files added, choose mp4 (mpeg4, h.264) from the profile settings panel.
What you need is click "Profile" on the lower left-hand side to open the Format panel like this:
After the Format profile window opens, simply find your desire format profile and pick it.
Stage 3.1 – Tweak output settings (optional)
Also of note, this Mac FLV to MP4 converter lets you configure the options manually for the final result file. By clicking the "Settings" next to "Profile", a settings window pops up.
If you are familiar with all these advanced settings for video & audio, you can fine-tune them to meet your need. For non-tech users, you can choose to keep them to the defaults.
Stage 3.2 – Select preset profile rather than a specific format
Some of you guys want to play the FLV movie file on a device like iPhone 6 Plus, iPad Air, PS3, or Android phones/tablets. Fortunately, this FLV converter know this and offers you a group of device-target preset options that are made for mainstream devices, which simplify the process and save you amount of time.
Here's how to convert AVCHD files to play on iPad tutorial with the program.
Stage 4 – Edit your video
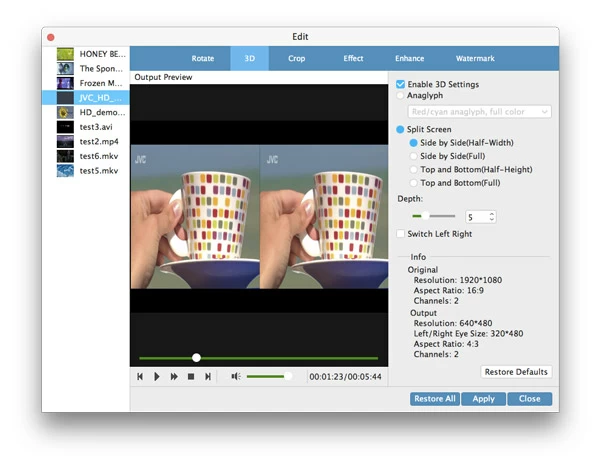
Click the EDIT icon on the top toolbar on main screen, you will enter the video editing mode.
The converter features a simple video editor that lets you trim, crop video as well as add effect and watermark to the video. You can do yourself a favor to experiment with the editing of video.
After the editing, click OK to close the window and back to main interface.
Stage 5 – Start converting your FLVs to MP4 format on Mac
When you're ready, hit the "Convert" button on the lower right-hand side of main screen, the software will now converting FLV file to MP4 file format on Mac computer.
Please keep in mind that the converting time may take a while, especially if your FLV files are high quality with large size.
About David James
 Video ConverterConvert files from one format to another
 iPhone Data RecoveryRecover deleted files from iPhone, iPad
 Blu-ray CreatorBurn video & audio files to Blu-ray
 Blu-ray PlayerPlay Blu-ray, DVD, and movie files easily
 Blu-ray RipperRip Blu-rays/ DVDs to digital files
 Blu-ray CopyCopy Blu-rays/ DVDs to another disc