How to Burn AVCHD to Blu-ray/ DVD Disc

David James
Updated on Aug 29, 2023
AVCHD (and the AVCHD Lite, a subset of AVCHD) is a format jointly developed by Panasonic and Sony to record high definition camcorder video. If you have a HD consumer device such as digital compact camera and hard disk-based camcorder, you probably have a lot of great AVCHD (Lite) videos that offer a range of resolutions including 1080p, 1080i and 720p.
Why need to burn the AVCHD to Blu-ray or DVD disc for Mac or Windows? Instead of streaming AVCHD video files on AVCHD player on your Mac or PC machine, it would be nice to make copies of those AVCHD videos into a Blu-ray & DVD that will play on a BD/DVD player in home theater—It's hard to beat the portability and ease of use of a Blu-ray or DVD media, especially when you wish to send your AVCHD footages to a not-so-techy family member or friend.
If you're trying to burn HD files—like AVCHD—to Blu-ray or DVD for playing in a BD player, you'll want something like Blu-ray Creator for Mac. The program is exceptionally easy to use and gives you any level of control over creating of both DVD and Blu-ray from AVCHD file in Mac, other digital videos, audios, photos are also supported (see how to burn .mov on Blu-ray on Mac). It even lets you create customized menu templates and add sound tracks. It has additional features such as making disc Folder and ISO image file as well as creating photo slideshow with your favorites.
For those who're using a computer with Windows XP or later operating system, you may give the software's cross-platform version Blu-ray Creator for Windows a try.
In case you are having trouble in converting the AVCHD videos to Blu-ray (or DVD) with the software, here below we offer a step-by-step procedure for your burning projects in Mac for example, let's get started:
How to convert AVCHD to Blu-ray / DVD for Mac OS X or Windows
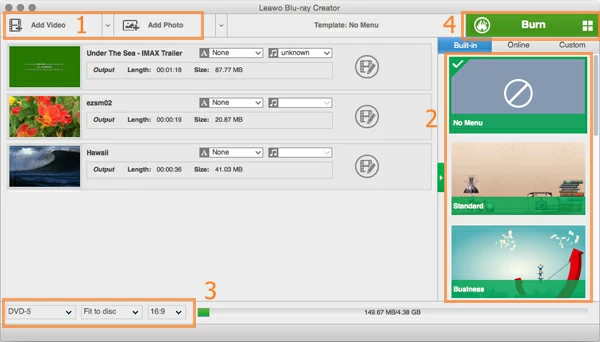
Fire up the application, drag the AVCHD video files that you want to burn onto Blu-ray from the local folder where they're stored to the program, or go to the top menu and click on the "Add Video" button to add your AVCHD source files.
After the files are added you can rearrange them in an order you prefer in the project area.

The amount of AVCHD video you can fit on a playable Blu-ray or DVD will vary by length and quality, so keep an eye on the calculator bar at the bottom of the screen. The blue portion on the left side of the bar shows you how much space you've used.
Now, insert a Blu-ray or DVD disc with enough space into your computer.
Go to the right portion in this AVCHD to Blu-ray Mac converter, where it will let you create menus for your project. The converter provides many free preset menu styles for handy use, including the themes of Nature, sports, Wedding, holidays, Education, and online templates etc. If you don't want to use a menu, choose No Menus.
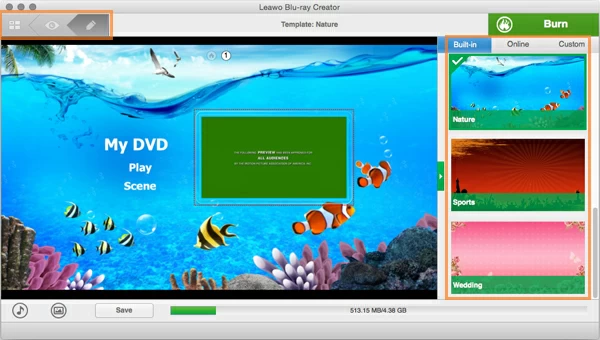
Click the thumbnail to preview the menu.

The AVCHD to Blu-ray converter allows you to customize the menu. On preview window, clicking on the 'PEN" icon on the top left side, it will switch you to the editing mode that you can change for your menu. You can change the menu title, button texts and colors; re-arrange the order of all items. What's more, you can add you own sound track and digital photo as the menu background through the "Music" and "Image" option on the bottom.
STEP 3
Set ouput settings
We should look at the export settings before burning!
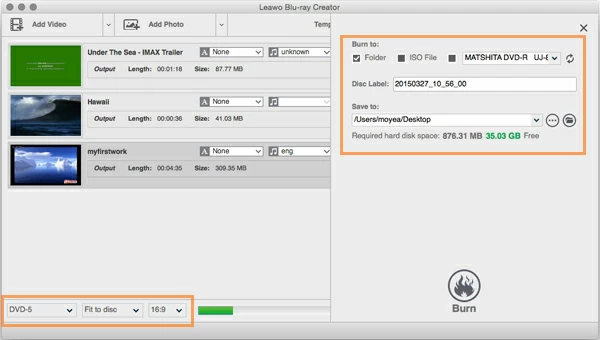
Click the "Burn" button at the upper right side of the main window, it will pop up a small window where you set the output options.
In our case, we will burn AVCHD to Blu-ray on a Mac, so we tick the third option in "Burn to". If you want to choose your output files, for example, as ISO image at the same time, you can tick the corresponding option.

STEP 4
Start the burn of AVCHD to Blu-ray on Mac
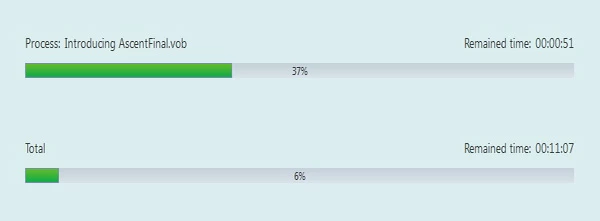
To begin burning the AVCHD movies to Blu-ray (or DVD), click the "Burn" image at the bottom (see screenshot above) and you're off.

After the blue portion arrives to the end of the total process bar, you've successfully burned the AVCHD to a Blu-ray disc on Mac, congratulations!
Have a good time with your new Blu-ray movie!
Related Extended Source:
Devices that can shot file in AVCHD: Panasonic Lumix FZ 1000 (4K supported), Sony PXW-X70, panasonic AG-HMC 150, etc.


About David James
 Video ConverterConvert files from one format to another
 iPhone Data RecoveryRecover deleted files from iPhone, iPad
 Blu-ray CreatorBurn video & audio files to Blu-ray
 Blu-ray PlayerPlay Blu-ray, DVD, and movie files easily
 Blu-ray RipperRip Blu-rays/ DVDs to digital files
 Blu-ray CopyCopy Blu-rays/ DVDs to another disc


