How to Import WMV into iMovie for Editing

David James
Updated on Aug 29, 2023
Apple iMovie is a powerful video editing application specifically for amateur users. It takes care of the editing on your Mac's or on iPhone/ iPad and lets you quickly create beautiful movies from your footage — and make it look like something straight out of Hollywood.
But unfortunately, supported video file formats are quite limited as input for iMovie. If you're trying to import a WMV into iMovie for editing, an error message will be displayed, stating that the file type is invalid. Since WMV is a proprietary Windows file format developed by Microsoft, one of the enemy for Apple QuickTime in digital world, iMovie won't allow you to directly import the WMV video files stored on local computer. However, you can convert these WMV to something what iMovie likes natively - like MOV, for example.
WMV converter for iMovie
The web is full of web-based and desktop-based video converting applications. If you want to a simple yet efficient tool of converting WMV to import into iMovie, Video Converter for Mac is a straightforward way of doing that. It continues to give a balance between the needs of beginners and power users, letting you convert video files that are in different types of formats into any digital video & audio formats you need, along with a library of device presets that you can choose from, or take more control over the output result by tweaking video encoding settings.
For those who're on a PC's and intend to convert your WMV or any other media collection, please refer to its Windows-based version — Video Converter for Windows. Downlink link below.
Instruction summary: to convert WMV and transfer to iMovie to create a iMovie project, open the tool, then drag and drop the WMV movie file on it. Then select iMovie natively supported format from the "Profile" dropdown list, and ensure to specify a file saving location. Then click the "Convert" button.
How to convert WMV video to copy into iMovie on Mac
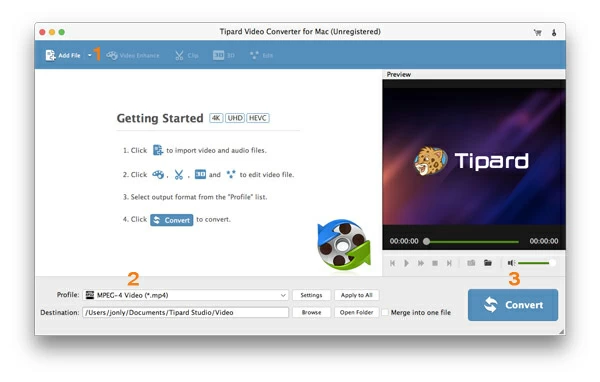
The software sports a clean, no-nonsense interface.
Stage 1 – Add WMV source files
Basically, you have to import WMV files to the program - which you can add either by drag-n-drop method or use the "Add File" option in the top menu. You can even add a whole folder of WMV video files.
Stage 2 – Select iMovie supported formats in the "Profile" pop-up menu
Now you get to decide which format you want to choose as output to be suitable for iMovie.
In the bottom left corner, hit the "Profile" drop-down menu to display the format-manager list. Under "HD Video" category, select either HD MOV Video (*.mov), or HD H.264/MPEG-4 AVC Video (*.mp4) as output. You can also go to "General Video" category and pick M4V MPEG-4 Video (*.m4v). iMovie have a full support of them.
After that, you need to define the location of the file output using the "Destination" box under "Profile" menu in the bottom left corner.
Next in "Settings" next to "Profile" menu, the WMV converter offers a lot of video converting settings available to you. Generally speaking, it automatically gives you the most reasonable settings by default.
For advanced user, you're allowed to go through and make further adjustments to the output file. Just keep in mind that you set the resolution to be same as the original file's if you want to keep the output file with a excellent image quality. If you know what you're doing you can go in and modify most of other settings including frame rate (fps), video bitrate (kbps), aspect ratio (16:9, 4:3), and more.
Choose from Preset
In this example in the article, we mainly focus on WMV to iMovie video conversion but, if you're aiming to convert your videos to view on a portable device, then the application can be incredibly easy to use. There are a great selection of presets in the list optimized for different devices, so you won't have to select a specific format from "General Video" category and then manually tweak every possible setting to be suitable for the device
Stage 3 – Click "Convert" and you're off
The last but time-consuming step, press the blue "Convert" button in the lower right corner to start converting WMV video to iMovie file on Mac OS X.
Wile the WMV videos is being converted, you'll be able to follow the progress bar in a new pop-up window. Wait until the process is done.
Depending on the size of original WMVs, and the number of WMVs you add in the process list, also the computer system resources, this can take anywhere from minutes to hours (approximately).
Happy converting!
About David James
 Video ConverterConvert files from one format to another
 iPhone Data RecoveryRecover deleted files from iPhone, iPad
 Blu-ray CreatorBurn video & audio files to Blu-ray
 Blu-ray PlayerPlay Blu-ray, DVD, and movie files easily
 Blu-ray RipperRip Blu-rays/ DVDs to digital files
 Blu-ray CopyCopy Blu-rays/ DVDs to another disc