How to Convert Video Files on Mac OS X

David James
Updated on Aug 29, 2023
Video Converter for Mac [Download] is powerful video converter that performed pretty to convert between all popular media formats includes ASF, AVI, DV, VOB, FLV, MOV, MP4, MPG, MPEG, RMVB, WMV, MKV, 3GP, 3G2, M4V, TS etc., Besides, you may also extract audio from video files. Now, follow this step-by-step guide to complete video conversion tasks. just 3 simple steps is OK.
STEP 1
Load video files into the program
Open the program, click "Add File" option to load source video and audio files. You could also add video folder by clicking the drop-down arrow icons respectively. After loading, you could select subtitles and audio tracks, playback loaded media files.
Please note that if you wish to combine all source files into one big file, check the "Merge into one file" option next to blue "Convert" button.
STEP 2
Choose Output Format
Click the "Profile" drop-down box to enter the Profile panel, where you could select a format as output format.
Besides, you can click the "Settings" button next to the "Profile" drop-down menu to configure output parameter options. You could adjust video and audio parameters including: Video Codec, Quality, Resolution (choose from provided options, or manually input the resolution you desire into the box according to your devices or players), Bit Rate, Frame Rate, Aspect ratio, Audio Codec, Audio Quality, Sample rate, Channels, etc.
If you want to convert without fiddling with any settings, using as few clicks as possible, try the ready-made device-target preset profiles, which are especially suited to quickly setting up a conversion for a portable device.
STEP 3
Start Converting Videos
Press the blue "convert" button on the lower right-side of the screen to start converting your videos on Mac, while conversion is processing, a bar displays showing you the status of process.
Edit video before converting (optional)
If you want to edit your video files, just click the corresponding edit button on the TOP MENU BAR of the main screen.
1. Trim video length
Click the "Clip" icon on the top menu to enter editing window, then you could trim video length to remove unwanted clips by setting Start Time and End Time values, or directly dragging the twins limiters on the play bar.
2. Edit the video - Rotate, 3D, Crop, Effect, Enhance and Watermark
Rotate
Choose the file you want to rotate, select "Rotate" column to rotate your video clockwise or counterclockwise, respectively.
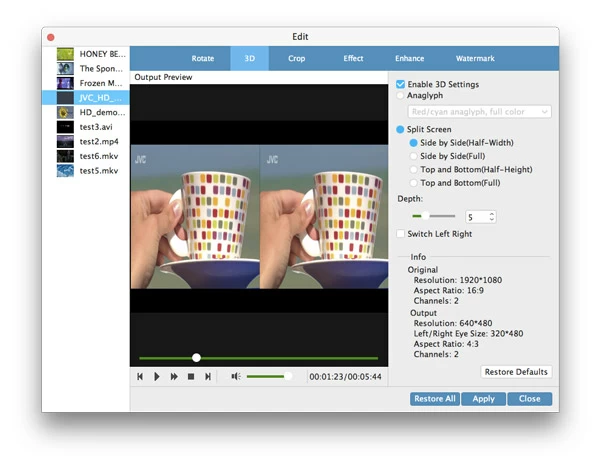
3D
On the editing panel, switch the "3D" tab. According to the 3D glasses you are using to enjoy 3D videos, pick one of the 3D setting modes from Red/Cyan, Red/Green, Red/Blue, Blue/Yellow, Interleaved, Side by Side.
Crop video size
Go to the "Crop" tab, select a Zoom Mode and aspect ratio (16:9, 4:3, crop area, original), then set the Left and Top values or directly drag the dot frame box on the left Original Preview window to get unwanted margins cropped. You could get instant preview on the Preview window.
Effect
Open the "Effect" tab, you could then adjust video brightness, saturation, contrast and valuezoom.
Enhance
Switch to "Enhance" tab, click the options o enhance your video quality such as removing video noise, reducing video shaking, upscaling resolution.
Watermark
Open the "Watermark" tab, slide the Watermark option to green to apply watermark. You could then slide Text option to green to add Text Watermark or slide Image option to green to add Image Watermark as personal signature. You could even make customizations to Text and Image watermark, including: text font, color, transparency, position, etc.
About David James
 Video ConverterConvert files from one format to another
 iPhone Data RecoveryRecover deleted files from iPhone, iPad
 Blu-ray CreatorBurn video & audio files to Blu-ray
 Blu-ray PlayerPlay Blu-ray, DVD, and movie files easily
 Blu-ray RipperRip Blu-rays/ DVDs to digital files
 Blu-ray CopyCopy Blu-rays/ DVDs to another disc