How to Burn MP4 to Blu-ray/ DVD for Mac & PC

David James
Updated on Aug 29, 2023
If you have various home quality mpeg-4 videos (.mp4) or h.264 files with MP4 extension that you want to save onto a Blu-ray & DVD and play on the Blu-ray player, luckily, here is the place you go.
While more and more users are likely to enjoy and share digital videos via the web or portable devices, there is still a requirement for burning your standard and high definition MP4 file onto a Blu-ray or DVD disc. For instance, you have an .mp4 footage that preserves memories of kids that you now wish to share with your grandma, but your grandma only has a TV and Blu-ray player and she is having trouble using the wifi. The best solution for this is often to burn the MP4 onto Blu-ray disc on your Mac or PC machine, then hand the disc out to your grandma.
There are many disc burning applications for creation of DVDs and Blu-rays from MP4 movies and other files, some are delightful in their simplicity, others come with rich features, today, we'll use a application called Blu-ray Creator to burn your .mp4 file to playable Blu-ray / DVD. It works both on Windows and Mac OS X.
Blu-ray Creator is one of the best piece of software available in the market for disc burning purposes, it can handle almost any file (mp4, wmv, mkv, mpeg, photos, etc.) you throw at it and produce high quality Blu-ray and DVD. It also comes with an array of diverse but well designed styles of template so that you can customize the overall format of the templates. It still has the power to burn files to folder file and ISO image.
On the other hand, if you were looking for a program to help you burn MPEG-4 video to Blu-ray / DVD and play it in a BD player on Mac, you may check out its equivalent version - Blu-ray Creator for Mac.
Note: A video-DVD is Standard-Definition (720x480pix) only, if your MP4s are high definition ((720p, 1080i or above), we suggest burning your full quality mp4s to Blu-ray disc.
In a few simple steps, here below is how to burn mp4 file to a Blu-ray in Mac, so as to view it on Blu-ray player.
How to convert and burn mp4 movies to a Blu-ray / DVD disc
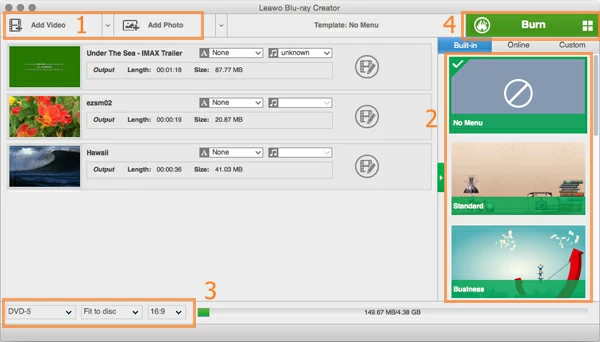
Launch the software, you'll be presented with a clean main window, where displays basic options - all clearly illustrated to avoid any confusion.
Click "Add Video" button on the top menu bar and browse to your (HD) MP4 file(s) on your Mac you want to burn to Blu-ray. Highlight the file(s) and click Open to import them into the program.
Tip 1: Here you can choose to load a single MP4 file by clicking the default "Add Video" button, or load the full folder with your video files by clicking the arrow icon next to the "Add Video" and select "Add Video Folder" option from the drop-down menu.
Tip 2: The program also allows you to add other source files like MKVs to burn to Blu-ray disc.

After your MP4 files imported, you will find that this MP4 to Blu-ray converter for Mac will automatically change the color of "Burn" option on the upper right corner from grey to green, and the burn function activates.
Edit the video (optional)
This step is optional. Before the burn, you are given very fine control over the video. At the right side of every video source, hit the 'Edit' icon to enter the video editing window, where you can trim and crop the video, take effect, put watermark and add 3D visual to the video.

In this step you can choose from different Menu styles from the right-side section of the program. The BD burner includes a wide variety of built-in templates such as Standard, Business, Childhood, holiday, Nature and Sports, and it has online menu templates you can download from, or make your customized menus.
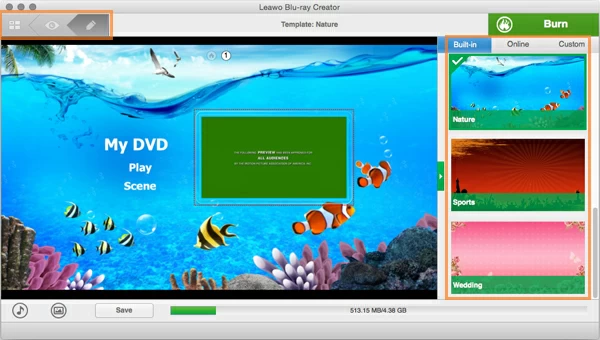
If you want to preview the menu how it looks in your Blu-ray project, simply move the mouse to the template, an eye-looking icon appears, click it. Then you will see the effect on the left section of the program. It looks like so below:

One of the advantages of this MP4 to Blu-ray converter is you can edit the menu, and add background images and music.
What you need to do is click the 'Pen' icon on the upper left of the window (see screenshot above), you will enter the editing mode and all options activated. Now, you can re-arrange the position of texts and thumbnail in the menu, and re-write the text information. On the bottom left side, you are allowed to add your own songs and photos as background music/image to the menu via 'Music' and 'Image' icon.
After everything is OK, back to the main screen of the software.
STEP 3
Configure project settings
Next, set the necessary parameters for the Blu-ray creation on the bottom left side of the main screen.
In our case, we want to compress MP4 file to fit onto a Blu-ray on Mac, so we choose "BD-25 1920x1080 (or 1280x720)" or "BD-50 1920x1080 (or 1280x720)", and then "Fit to Disc" and set aspect ratio to "16:9".

STEP 4
Convert MP4 to Blu-ray for Mac
Once you have everything set the way you want it, it's time to begin the BD disc burning.
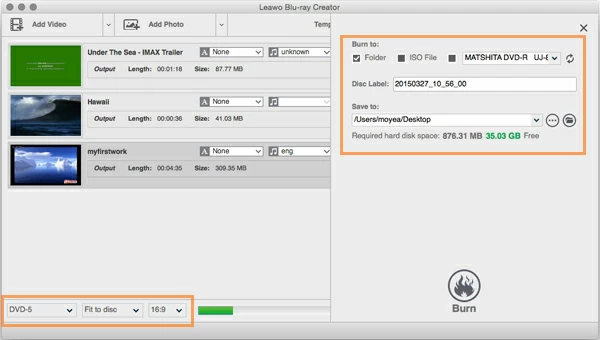
Insert a blank Blu-ray disc into your computer, and click the green "Burn" button at the upper right corner of the software, this will pop up a small window (See screenshot above) asking what you want to burn. In our case, we just want to a creation of Blu-ray, so we select the BD option and uncheck the "Folder" and "ISO File" options.
Again, press the "Burn" button to begin converting your standard mpeg-4 (.mp4) or high definition 720p & 1080p h.264 mp4 files to Blu-ray disc in Mac OS X.

Tip: If you MP4 files (or other source files) are full 1080p resolution and too large, the MP4 to Blu-ray converting process may take hours. We suggest you let the program run over night so you don't have to be bored.
Anyway, you'll want to pop the disc into a Blu-ray player connected to a TV and make sure it works.


About David James
 Video ConverterConvert files from one format to another
 iPhone Data RecoveryRecover deleted files from iPhone, iPad
 Blu-ray CreatorBurn video & audio files to Blu-ray
 Blu-ray PlayerPlay Blu-ray, DVD, and movie files easily
 Blu-ray RipperRip Blu-rays/ DVDs to digital files
 Blu-ray CopyCopy Blu-rays/ DVDs to another disc


