How to Convert FLV to MOV File on Mac & PC

David James
Updated on Aug 29, 2023
The internet has made it easier than ever to stream movie files and share video footage with friends online. Let's say you download a video clip from YouTube that ends with .flv file extension, and now you're trying to convert this FLV file into MOV format for Mac so you can watch it on Macs using QuickTime media player.
FLV is the standard flash file format for delivering video streams on websites and video channels (YouTube, Yahoo! Video, Hulu, metacafe, etc.), and the FLV flash video is often in small size but a excellent quality. For most cases, you can download and install Adobe Flash Player on your Mac and Windows computer to play flash FLV video files without any issue, but that doesn't mean converting videos in .flv to .mov or other files is a thing of the past. The limited support for video formats on many of devices themselves, particularly for Mac-centric products such as QuickTime, iMovie, iPhone, Apple TV, makes FLV conversion a necessity.
FLV to QuickTime MOV converter – Windows and Mac
We like Video Converter for converting digital video formats. You FLV flash files can be easy to be converted to MOV with it. The converter is one stop solution for all your video conversions need, which gives you the ability to convert file from all key formats you come across to modern, widely used file formats such as MP4 (h.264, mpeg4), QuickTime, AVI, MKV, WMV. And it allows you to do a simple conversion with presets output, without knowing the exact video and audio codec, fps, resolution, etc. Besides, the program has a handy of advanced features included behind the clean interface.
In the example below I am going to using the Mac version of the converter to transfer FLV file into MOV file on Mac computer. Snow Leopard 10.6 or above is supported.
How to convert FLV to a QuickTime .mov format in Mac
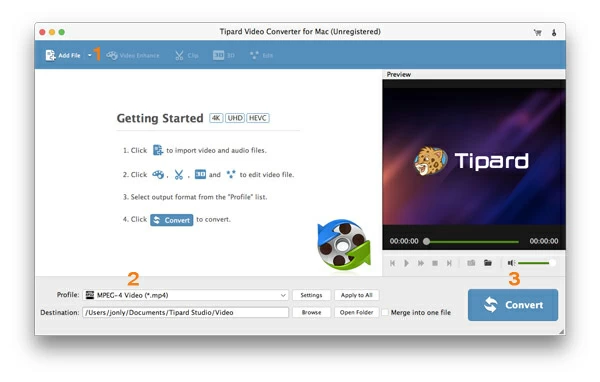
The first time to open the program, you will see a clean main screen like the screenshot below.
The options "Add File" "Profile" "Convert" we highlight are the must-have for conversion.
Stage 1 – Import FLVs
To do this, go to folder where your (YouTube) FLV videos are stored on your Mac. Drag and drop them into the specifically marked area.
Or start choosing FLVs by clicking the "Add File" button at the left side of top bar on the program window.
Note: here you can choose other types of movie files as input, such as AVI, MP4, WMV, SWF, F4V, MPG, MKV to be converted into MOV format.
Stage 2 – Pick your transcode options
Once the FLV files are in there, you can quickly specify the target type of format you'd like to export for. For our case in this article, we need a MOV format.
So, click the "Profile" button at the lower left side of interface, this will pop up a drop down panel. The default look will like this:
It's really convenient for any level of users, even for a beginner to understand the window, as all profiles are sorted out. For our simplicity, pick General Video > MOV Video.
Related: how to download videos off YouTube and add to iTunes
Next, click the "Destination" option under "Profile", this will open a small window requiring you to select a target local directory to save the result files
Stage 2.1 – Encoding Settings
When you click the "Settings" next to "Profile", the output options window will open. Default settings are optimized already and can be stuck with, but you may choose to adjust the values if you require more.
Stage 2.2 – Pick preset
There are a whole range of device-targeted profiles you can choose from to convert your FLV or other files for watching on a device you happen to own.
When you click on that preset, this FLV to MOV converter for Mac will automatically set the most appropriate output settings for you.
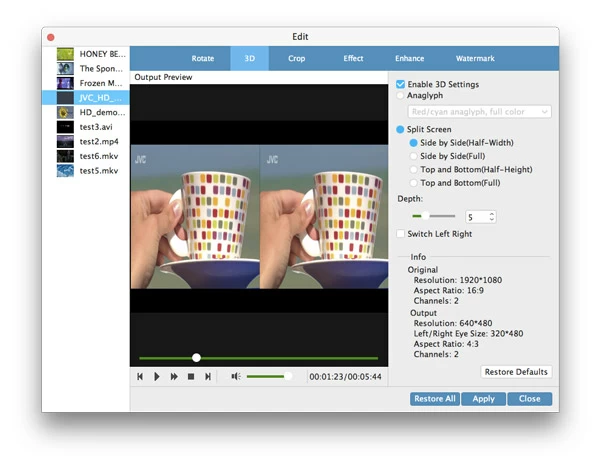
Stage 3 – Edit video prior to conversion
In-depth editing options are also included in this FLV converter that enables you to trim, crop, and layer special effects to a video to enhance the output.
It is optional if you feel no interest.
Stage 4 – Start converting FLV into MOV file on your Mac computer
If the setting mentioned above are correct, click the "Convert" button at the bottom right side and let the .flv to .mov for Mac conversion take place. You can track the process with a progress bar like so:
Once the process is complete, you're free to play the newly-minted QuickTime .mov files on your computer QuickTime player or iOS device anytime.
About David James
 Video ConverterConvert files from one format to another
 iPhone Data RecoveryRecover deleted files from iPhone, iPad
 Blu-ray CreatorBurn video & audio files to Blu-ray
 Blu-ray PlayerPlay Blu-ray, DVD, and movie files easily
 Blu-ray RipperRip Blu-rays/ DVDs to digital files
 Blu-ray CopyCopy Blu-rays/ DVDs to another disc