How to Play YouTube Video on QuickTime

David James
Updated on Aug 29, 2023
Two parts included: 1) Convert downloaded YouTube videos, 2) Download YouTube and convert to QuickTime.
YouTube is a popular video-hosting site where users can watch and upload videos to share with friends. Many users with third-party downloading apps even can download favorite YouTube videos and save to local folder so they can play them on media players (QT, WMP, VLC, etc.) watch on portable devices, or simply manage those YouTube videos in iTunes, Windows Media Center without an Internet access.
Now that you have YouTube video clips downloaded, here comes the tricky part. Since YouTube uses WebM, H.264/MPEG-4 AVC, and Adobe Flash technology to display videos online, many of downloaded YT videos may end with .flv or .webm file extension. So if you want to play those YouTube video onto QuickTime player on Mac, for example, an incompatible playback error would pop up in front of you. QuickTime Player supports a limit of media file formats and codecs except for FLV and WebM.
In order to take an YouTube stream and view in the QuickTime video player, you will have to convert the YouTube video to QuickTime supported format. Apple QuickTime itself does not include converting capability at this time so you will need to use a third party burning tool. This article exemplifies how to convert videos from YouTube to QuickTime player with Video Converter, a reliable tool that lets you convert videos from one format to another and produce excellent end results. It also comes with video editing feature and has preset profiles available for working with device of your choice.
The guide below is written using the Mac version of the program, but the steps are identical to that of Windows.
Part 1: How to convert YouTube video and play on QuickTime in Mac
Stage 1 – Select downloaded YouTube source clips
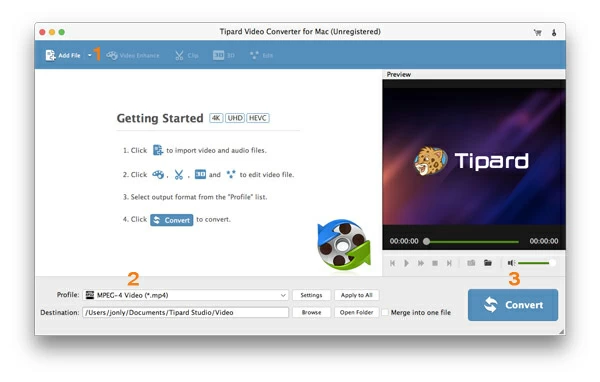
To add file(s) into program, click the "Add File" button on the top menu and open the file(s) using the pop-up dialog. Other way to do it is to directly drag-n-drop YouTube file(s) on the program's window.
Note: It is a great application that you can use it to process multiple videos in one go.
Stage 2 – Set up the output
When you finished adding YouTube videos it is time now to select the QuickTime friendly format for output converting.
Click the "Profile" dropdown on the lower left side of the GUI, it will bring up the format selection panel. Select MOV Video, M4V Video or MP4 Video that QuickTime Player reads well there as shown below.
Stage 2.1 – Additional format settings
For video experts, this Mac YouTube to QuickTime converter even gives you options to change the video encoding settings such as bitrate, aspect ratio, resolution, along with a slew of other settings for adjusting the audio quality.
You can do this by clicking the "Settings" next to "Profile". Here I just accept the default settings, which are fine.
Stage 2.2 – Preset selection
You can also use the built-in presets which are especially designed to quickly setting up a conversion for a portable device such as iPhone, iPad, Android phones, PS4, etc. This will simplify the format choosing task without fiddling with any settings.
Stage 3 – Start converting YouTube videos to QuickTime format
Click on "Destination" button in the bottom-left corner of main interface (under "Profile") and the dialog opens up where you can set the name and the destination folder of resulting file.
Now, start the real process with the blue "Convert" button to convert all of your YouTube clips in the list to QuickTime file format in Mac.
When conversion process is started the program will display a progress bar under the item telling you the conversion status.
After the conversion complete, the new created QuickTime files will be ready on your local folder you set previously, you then can play them on your QuickTime Player or add to an iOS device and enjoy on the go.
That is it!
See also: how to convert FLV movie files to MOV on Mac OS X
Part 2: How to download Videos from YouTube and convert for QuickTime
As for downloading video clips from YouTube, using AllMyTube couldn't be simpler. It supports downloading from 1000+ video sites (including Instagram, Facebook, Break, Vimeo, Dailymotion) and convert to different of video & audio formats all in place.
The operation is actually easy and simple.
1. Locate the YouTube video you would like to playback on QuickTime on Mac or PC, Copy the URL from the address bar of the browser, and then paste it on "PASTE URL" field at the top left of this application.
Note: you can also simply click the "Download" button appearing at the top right of the playing screen, or directly drag the URL of video and drop to blank area of the application to begin YouTube video downloading task.
2. Go to downloaded video list by clicking the "Downloaded" category on the left portion, then highlight the downloaded item you want to convert, and click the "Convert" button.
3. This will display a panel asking you to choose an output file format.
4. After do this, click OK to begin conversion.
About David James
 Video ConverterConvert files from one format to another
 iPhone Data RecoveryRecover deleted files from iPhone, iPad
 Blu-ray CreatorBurn video & audio files to Blu-ray
 Blu-ray PlayerPlay Blu-ray, DVD, and movie files easily
 Blu-ray RipperRip Blu-rays/ DVDs to digital files
 Blu-ray CopyCopy Blu-rays/ DVDs to another disc