How to Import AVCHD MTS into iTunes Library

David James
Updated on Aug 29, 2023
Apple's iTunes began as a simple media management application but has quickly grown into a full-fledged entertainment center that let you add to, organize and enjoy all forms of digital contents, including movies, music, books, TV shows you already have on your Mac or PC machines, as well as sync them to a portable iOS device. iTunes 12.2 includes new channel — Apple Music in it, along with the Beats 1 radio.
The problem however, you will encounter is that iTunes only supports QuickTime format and MP4 video file natively, making many of the videos you already have on your media collection impossible to be added directly to iTunes library. If you are importing AVCHD .mts footage recorded by camcorder into iTunes, things can get tricky, iTunes can't recognize MTS and M2TS file format. Luckily, there is an abundance of MTS converters you can download for your desktop to essentially convert .mts video into a iTunes readable file type.
MTS Converter for iTunes — Mac & Windows
For most purposes you can't beat Video Converter for Mac's ease of use and still rather high flexibility. It converts MTS to iTunes for Mac use, and can convert to and from more video/ audio formats than you could ever need neatly and systematically. The tool also include a wide range of device-specific presets that are useful for iOS, Android and Game console owners.
If you're on a PC machine and want to convert MTS to iTunes or other files, you can use its Video Converter for Windows. This Windows version will takes full advantage of CUDA and AMD acceleration technology that helps you to convert videos up to six times faster than ever before.
Here's a quick walkthrough of the process about converting MTS to import into iTunes library.
MTS to iTunes Workflow
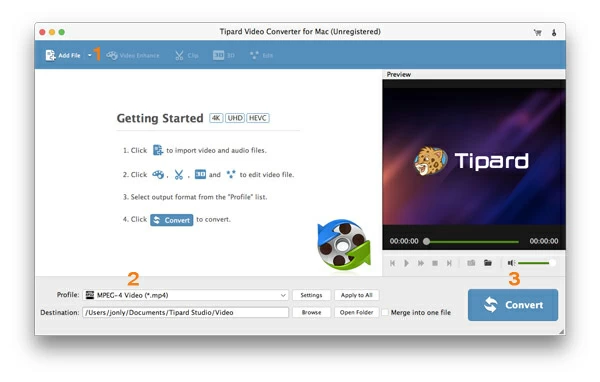
Stage 1 – Launch the MTS converter and load source files
The interface is straightforward at first glance, but once you learn you way around, behind the simple design it offers you a great selection of advanced conversion options to meet your requirements.
Adding MTS movie files is as easy as clicking on the "Add File" button located in the top left of the window, and navigate to the folder where your MTS is kept, select them and click OK.
Stage 2 – Set output
If you're importing video in .mts to iTunes in order to sync it to an iOS device (i.e. iPhone, iPad Air), instead of selecting a specific iTunes friendly movie format that you want to convert the MTS into, click "Profile" drop-down menu (see lower left side of the window), from the left pane, click the "Apple iPhone", "Apple iPad" or "Apple Apple TV" category and select the device from the list at the right — there are presets available for each generation of the device.
Related: How to Import WMV into iTunes
Once you select the device preset, it will automatically offer an appropriate compromise between video quality, file size, resolution and speed of conversion for you.
Or if you just want to let your iTunes library to organize and manage your MTS video files, should this be the case, you can choose a specific format from the list instead.
Although Apple iTunes favors the MP4 and QuickTime MOV format, we suggest you stick the format to MP4 as that is capable of being played across multiple platform — Mac, Windows, Linux, etc, you don't have to re-convert the MTS files again later in some situation.
So here you pick Profile > HD Video > HD H.264/MPEG-4 AVC Video (*.mp4).
Advanced users can also click on the "Settings" button next to "Profile" to tweak the conversion settings. The MTS converter offers a boatload of customizable options including bitrate, codec, frame rate, aspect ratio, resolution, etc. for the output video.
I would recommend leaving all the settings as is unless you know what you're doing.
Video editing if required
This MTS converter for Mac/ PC also includes video editing filters at the top menu for you to manually crop, rotate, trim the original video, and add special effect on it.
Stage 3 – Start converting MTS!
Now to the right of "Destination" field located at the lower left side of the window, click "Browse" then give your converted file a path and click OK.
Simply click the blue "Convert" button at the bottom to start converting your MTS videos to iTunes friendly file. Leave the program do its work and make yourself a cup of tea as you'll have a bit of a wait before the converting process completes. You can monitor the progress in a new window.
Note that the process notifies you when it's finished if you tick "Open output folder" option in the lower left side of the window.
Another cool feature hidden in this MTS to iTunes converter is you can go to Preferences > Conversion Down > Shut Down to have the software automatically shut down your computer once the conversion process is finished. This is really convenient if you want to go to bed and let the software do its job silently.
When the conversion is done, all that's left for you to do is drop the converted movie files into your iTunes library and transfer to your iOS player later.
About David James
 Video ConverterConvert files from one format to another
 iPhone Data RecoveryRecover deleted files from iPhone, iPad
 Blu-ray CreatorBurn video & audio files to Blu-ray
 Blu-ray PlayerPlay Blu-ray, DVD, and movie files easily
 Blu-ray RipperRip Blu-rays/ DVDs to digital files
 Blu-ray CopyCopy Blu-rays/ DVDs to another disc