QuickTime Converter for Mac & PC: Easy, Quick

David James
Updated on Aug 29, 2023
The Internet is full of different of digital file formats that most of us could come across every now and then. Unfortunately, most media players and devices only work with certain types. Some probably has the support of AVI, WMV, MKV for playback, while others could only take QuickTime .mov, MP4, M4V as input files.
If you have all of your movies and TV shows in one correct format, you then can play them on the player or device you own without issue. However, if your media library is a mix of different type of video files that you got from downloads, rips and saved copies, things can be tricky. Today, we're going to look at QuickTime video converter that can faithfully convert the QuickTime video to a wide range of file formats that are viewable on anything from smartphones, tablets, to TVs, and to game consoles; on the contrary, you convert movies to QuickTime file for use on Mac computer, or transfer to iOS devices and play on the go.
QuickTime converter — Mac, Windows
Video converters have been around for several years, but nothing is quite so simple and flexible as Video Converter. It's a versatile application that does more than you expect. It can convert QuickTime video on Mac or PC's to other format, or vice versa; and handles a bunch of different formats like MP4, WMV, AVI, M4V, MKV, FLV, MPEG, WebM for a range of multimedia devices with sensible presets. It comes with a significant amount of other features, such as the ability to tweak conversion settings, edit your video, batch conversion, multi-language support, and a list of other customizable options.
1. Friendly interface and intuitive layout. The QuickTime video converter features a simple and clear interface, along with a step-by-step basic instructions on the main area of program's window. Even a novice will master the program quickly.
2. Optimization device profiles. It's excellent experience for watching your movie and TV shows on a multimedia device these days. The Windows & Mac QuickTime converter software understands this and ship with a full library of predefined preset profiles that tailor your (QT video) conversion for whatever device you happen to own, ranging from iPhone, iPad, Surface, Android smartphones, tablets, Kindle Fire to Xbox, PSP, Wii and more.
3. Tons of output formats. The program's long output format menu supports almost every file format you can think of, including the most commonly used formats like AVI, WMV, MP4, MOV, M4V, MP3, WMA, M4A, AAC, and less-common but increasingly popular formats like MKV, OGG, VOB, MPEG, FLAC, AC3, WAV, APE, AIFF.
Find More: How to Convert QuickTime File to WMV on Mac OS X.
4. Conversion settings tweaks. The QuickTime converter for Mac/ PC gives you a set of more advanced options to control over how converted files will look, allowing you to fine-tune things of a video such as bitrate (kbps), video & audio codec, resolution, aspect ratio, frame rate (fps), sample rate (hz), channels,
5. Handy Video editing filters. There are a group of video editing filters included in this QuickTime converter on Mac/ PC, and they'll take care of basic editing tasks you need, such as the ability to trim unwanted parts, rotate the video to correct direction, crop the frame of the picture, personalize the final video via adding a watermark, remove the video noise, adjust visual effect of the video, and more.
6. Fast conversions. The PC & Mac QuickTime video converter is capable of supporting multi-core usage and multi-threading conversion to speed up the conversion. For those who're on a Windows machine, the software even check your computer's graphics card and allows you to enable nVidia CUDA and AMD acceleration.
7. Flexibility. The PC/ Mac QuickTime converter can convert your QuickTime movie or other files in batch with drag-n-drop feature, and you can specify the software to shut down the computer after conversion, this is perfect for running a batch conversion overnight.
Now, follow the instructions on the screen to install this QuickTime video converter on your computer.
This step-by-step guide illustrates how to convert QuickTime video files on Mac OS X into any other formats you want so you can play and share the video more easily. You can also convert your files into QuickTime .mov file in the exact same way as described in the guide.
How to convert QuickTime files using QuickTime video converter on Mac
Stage 1 – Select your QuickTime file sources
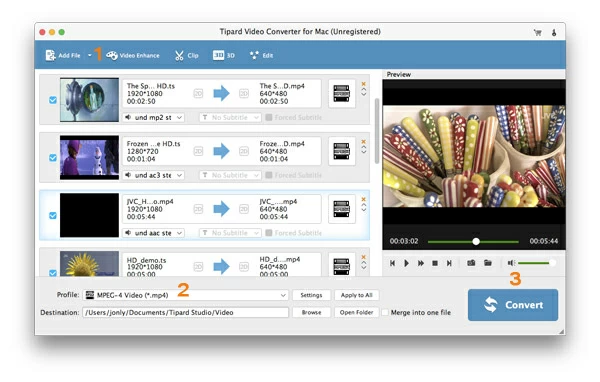
The moment the software launched, you'll this QuickTime converter for Mac sports a extremely clean and intuitive interface with an inviting layout.

To begin, click the "Add File" button in the top menu and then use the pop-up explorer window to select the QuickTime video files you want to covert. Then press Open.
Tip: clicking the arrow next to "Add File" will display a "Add Folder" option, which gives you the ability to import a entire folder that contains your QuickTime files to the program window.
This QuickTime video converter supports a lot of files converted in one go, so that you can add many different type of files from different locations as one big job.

Stage 2 – Select an specific output format or device type or manufacturer from "Profile" menu
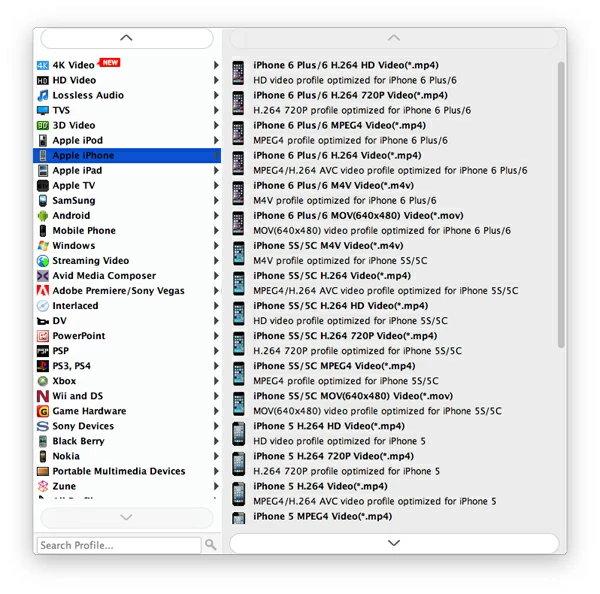
Now select "Profile" drop-down menu in the bottom, this will open a new pull-down panel with a large number of video, audio format options and device presets.
If you convert QuickTime file on Mac to a MP4 format, for example, what you need is head to "HD Video" category in the panel, and then select the offered HD H.264/MPEG-4 AVC Video (*.mp4) option from its list. The principle is the same for other output formats (wmv, avi, m4v, mkv, etc.) if you like.
Next, to the right of "Destination" box, hit the "Browse" button and choose your output location.

If you're an advanced user who want to take more control over the QuickTime conversion process, click the "Settings" button next to "Profile" menu you will see a profile settings window that displays.
In the window, the defaults should be enough for most people, but if you're looking for something more specific, you can change the settings manually including bitrate, frame rate, resolution, codec, sample rates which affects the resulting quality and file size of output file.
The QuickTime converter for Mac also allows you to create your own custom profiles. If you do manage to assemble a particular group of settings which you'll use later again, you don't have to re-tweak them in the window each time. Just click the "Save as..." button in the top right side of the window to save them as a custom profile and you'll see it listed in the "User defined" category in "Profile" menu.

Choose from presets
The application also includes a large number of presets in the "Profile" menu, making it easy to directly convert your movies to watch on Apple iOS players, Android devices (smart phones, tablets), as well as handheld game consoles and other multimedia devices.
You don't need to know about the video specifications for you device, or head to its official site to check user manual. Once you select the preset profile you like, this Mac QuickTime video converter starts churning out a new video file in a resolution and format optimized for the target device.

Edit your video (optional)
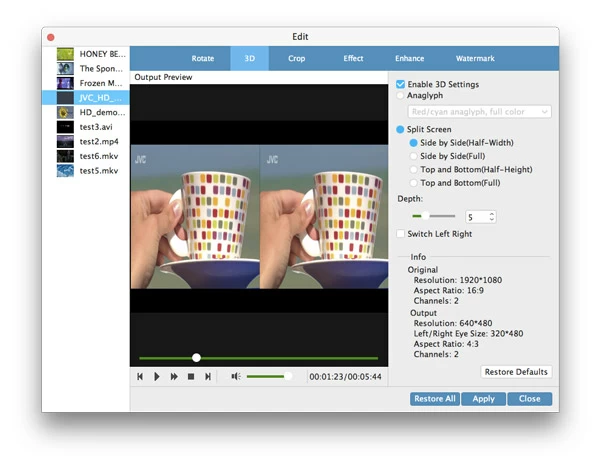
It's also important to note that before converting your (QuickTime) video you can perform basic editing on the video to enhance the result output. You can access this by clicking "Edit", "Clip" or "Enhance" on the top menu.
If you want to remove the black bars on the top and bottom sides of the video, for example, you simply switch to Crop tab in the opening window. If you know how much pixels to cut, you can set the numbers in "Crop Area Size". More likely you don't, so better manually tweak it. Alternatively, by using a mouse, you could set the borders of the black bars.
This Mac QuickTime converter also features other video editing capabilities, such as the ability to trim and rotate your video, remove video noise, merge multiple parts into a single unified file, tweak brightness contrast and saturation, add personal watermarks and more.
There are six filter tabs located at the top of the editing window.

Stage 3 – Click "Convert" and let the QuickTime converter do its job
After you have everything configured how you like, click on the blue "Convert" button at the bottom corner and sit back while this QuickTime video converter for Mac goes to work.
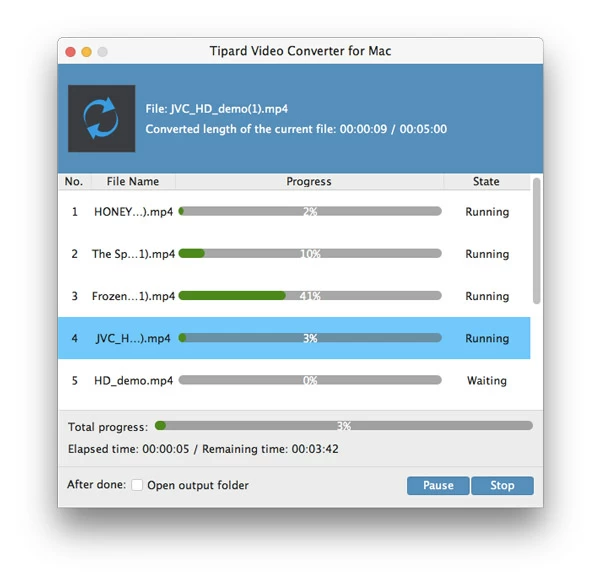
You can track the progress by looking at the progress bars on the process window.
When the conversion process is finished, you should now see your new created at the location specified. Open them in your favorite media player and see if they are good for you.
Enjoy!


About David James
 Video ConverterConvert files from one format to another
 iPhone Data RecoveryRecover deleted files from iPhone, iPad
 Blu-ray CreatorBurn video & audio files to Blu-ray
 Blu-ray PlayerPlay Blu-ray, DVD, and movie files easily
 Blu-ray RipperRip Blu-rays/ DVDs to digital files
 Blu-ray CopyCopy Blu-rays/ DVDs to another disc


